Was bristlen with concrete? 6 instructions for easy and useful DIY projects
Pinterest shows us all the latest trends and this time it is based on many craft ideas. It goes without saying that it is possible for DIY projects made of concrete, which could be implemented in just a few minutes, and most even with only a few materials. We can create some creative ideas for concrete with concrete today. Thanks to the instructions, you can get beautiful and practical decorations for your home, which you can only proudly, without bringing your device to the newest location. The concrete is beautiful, concrete is modern, versatile and simply wonderful!
Caving with concrete, but with which one?
Today, in practice, so-called Bastel-Beton angeboten. As a result, it is a powder blend, which retains cement and does not need to add water. A major advantage over the concrete used on the building is that it is very fine, while concrete requires a rock break, which falls rough. For others, it is non-toxic concrete, it was ideal for making concrete with children's power.
It also gives Feinbetonwhich can be used for the restoration of jewelery and other small details, as it is very fine. The result is cobblestones with a smooth and even surface. If you cannot pour concrete again, without freehand molding and kneading, use the so-called Knetbeton. These contain fibers and plastics that enable the knots.
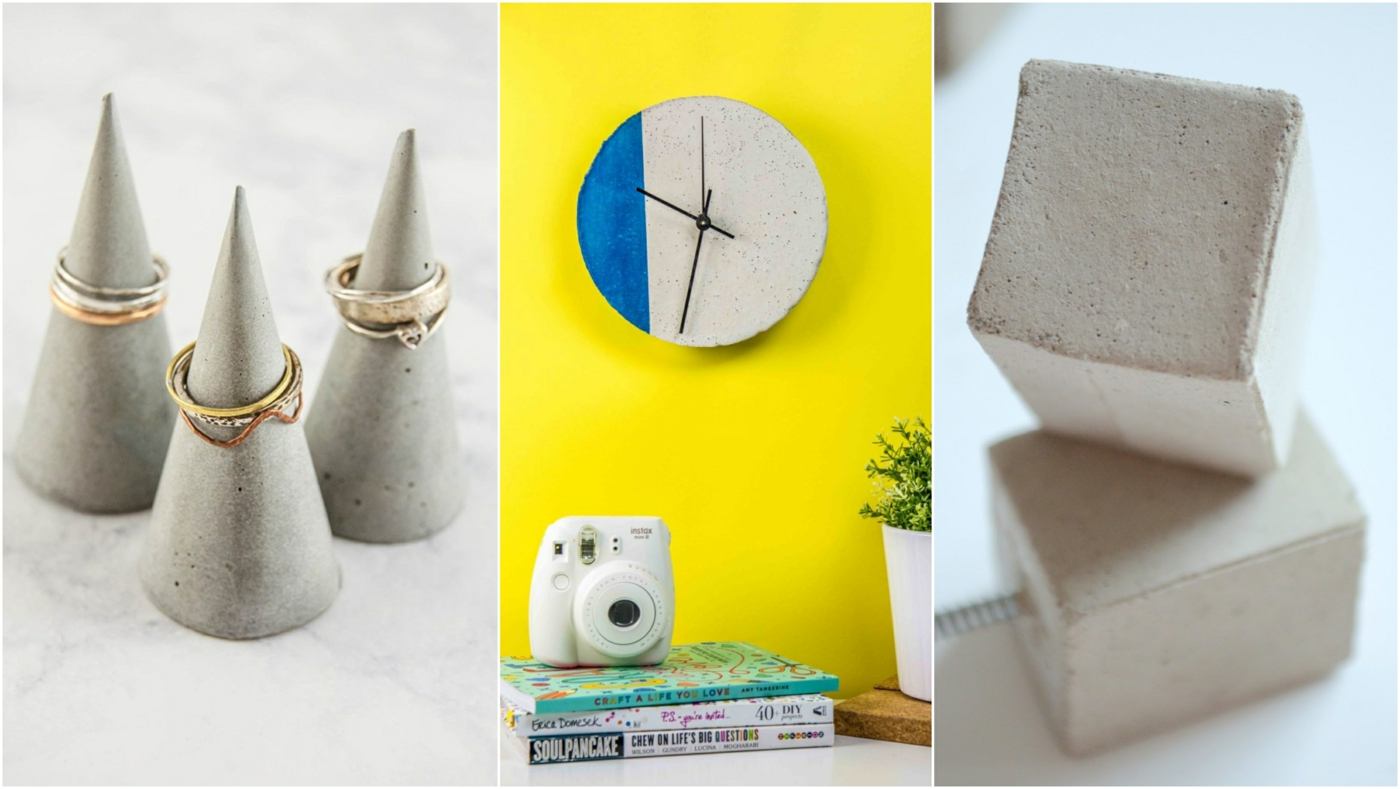
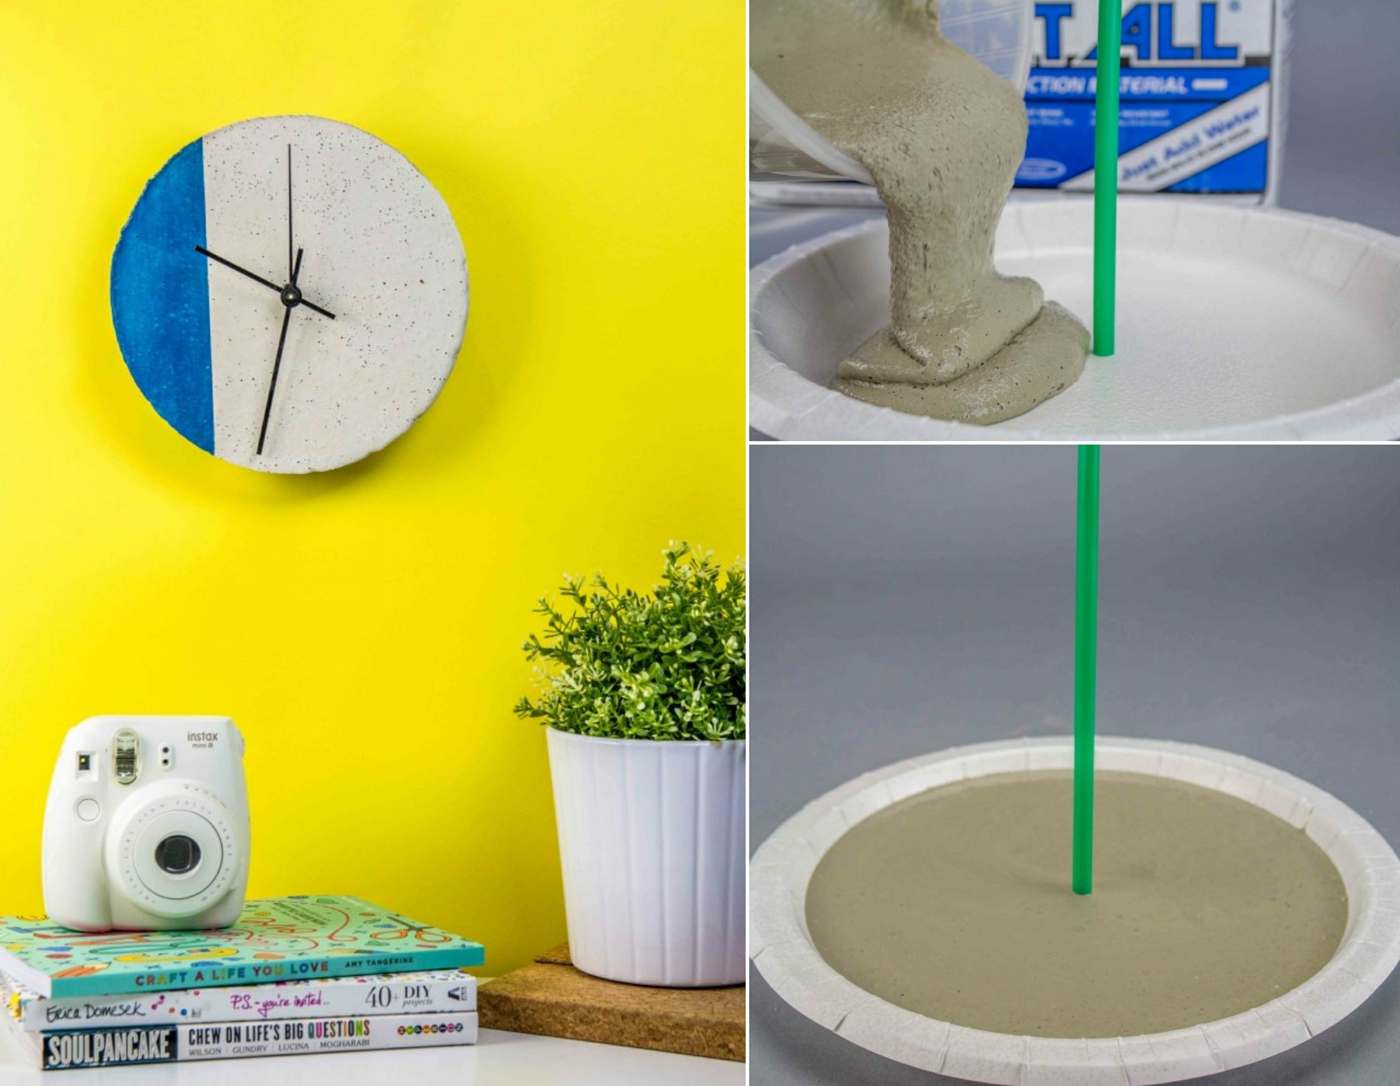
Crafting with concrete - instructions for a watch
- Bastel-Beton
- Container for mixing
- etwas to betray, e.g. a fork or a quirl (these can be reused if you clean them immediately from concrete)
- Cardboard counter in believer size (the size of your future watch)
- Strohhalm
- Set for watches with watches and watches
- Batterien
- Klebeband
- Farbe
- Pinsel
Do you make these watches with concrete? Nothing lighter than tie! Mark the center of the counter and stick it to the straw with the help of adhesive tape, which it can not slip. Then, mix the concrete mix with water as you follow the manufacturer's instructions. Then gently pour the concrete into the counter and evenly distribute it with one stick, spoon or other auxiliary. Let the concrete tighten.
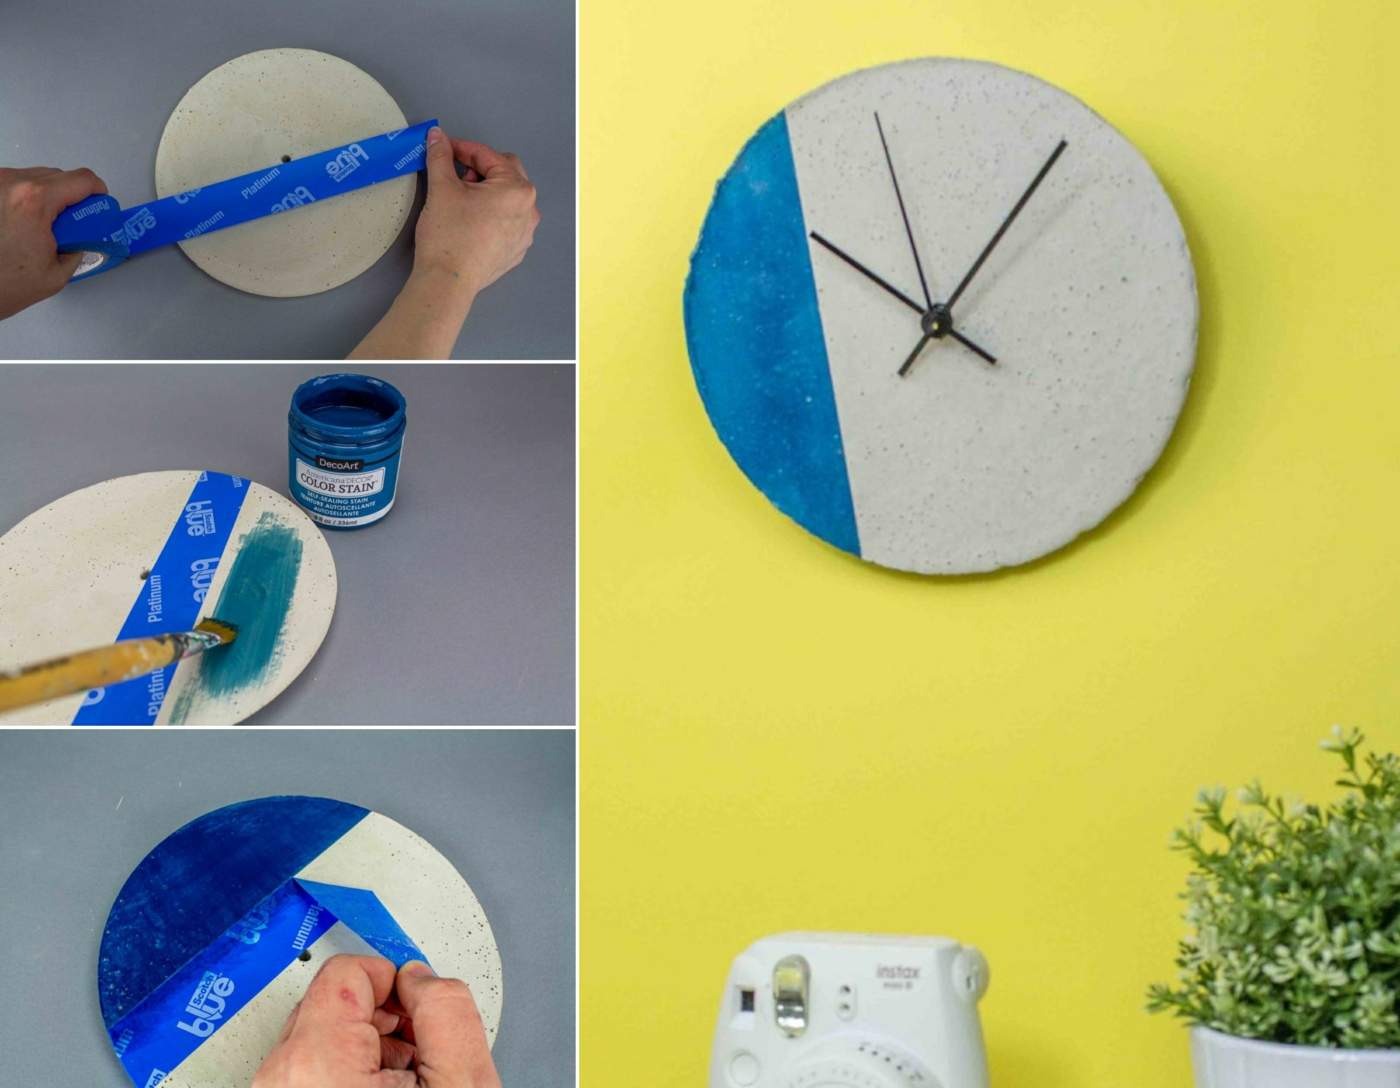
Take the concrete out of the counter and remove the straw. Now you can make the watch believable by sticking and painting with tape. The example is just an excitement. You could paint on the concrete clock if you could. Letting go of the color, remove the tape and build the watch set. Set the time, hang the clock and wall or set them up and enjoy your new, practical concrete deco!
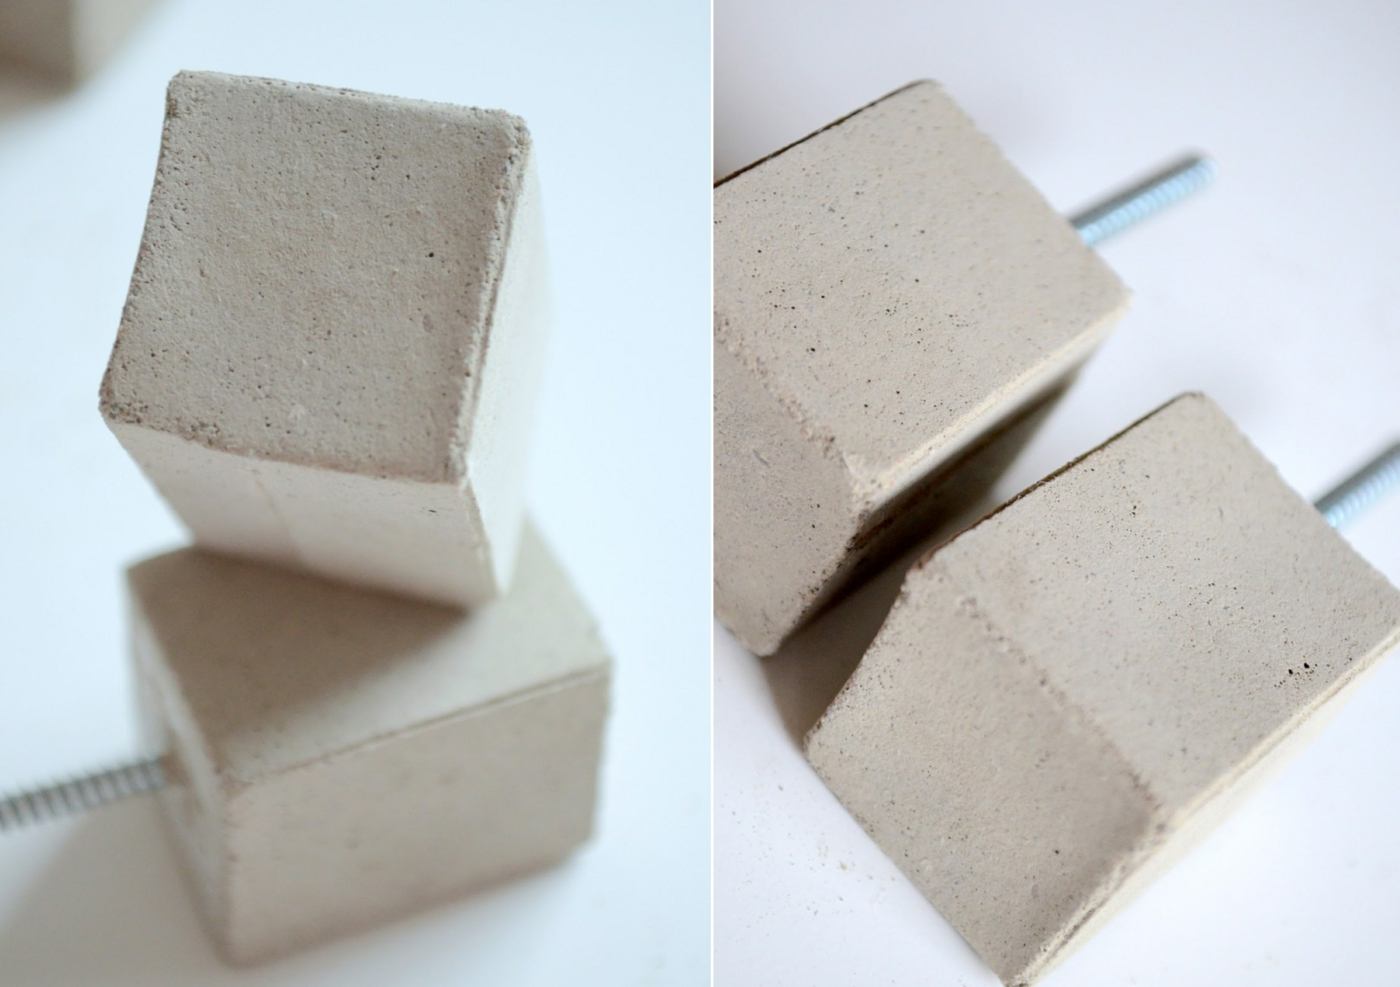
Beam handles with concrete
- little Pappschachteln
- Schere
- Papierklebeband
- Screw for furniture handles
- Bastel-Beton
- Wasser
- Plastic container or other container
- old fork for mixing
- Gummihandschuhe
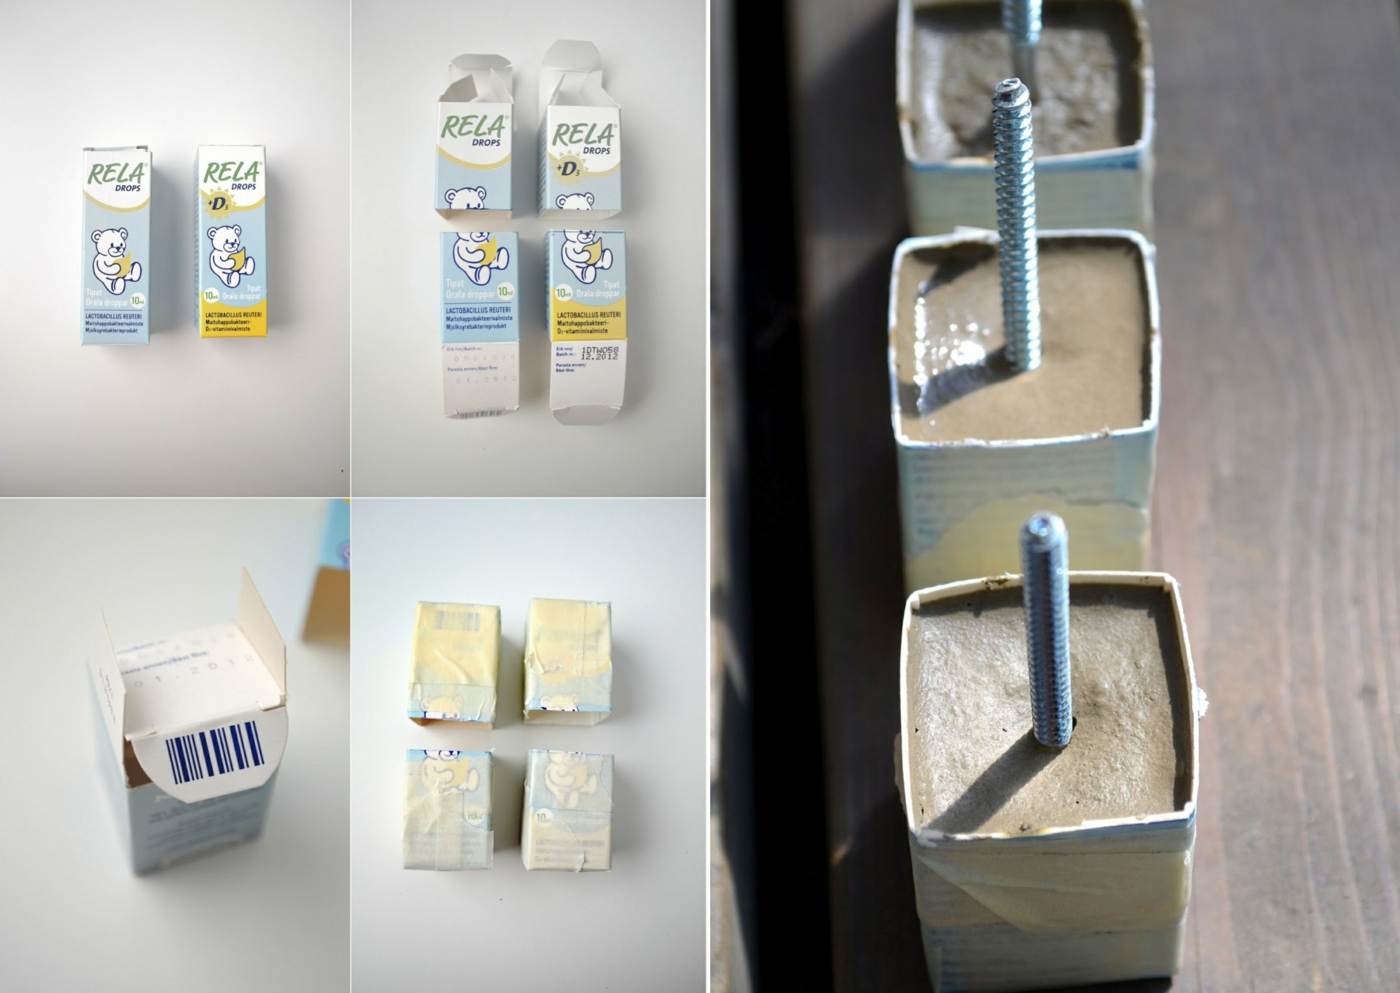
You can seldom take waste from concrete to the household in aid of concrete or concrete, which in this case is a pestle of pharmaceuticals. Cut the small cardboard boxes to the desired size. By way of example, the elongated shaft is halved. Slap the latches to close them out. Otherwise, they add later prints to the concrete. Now reinforce the small cartons with the paper tape, and simultaneously close one of the two openings. You have already repaired molds made of concrete.
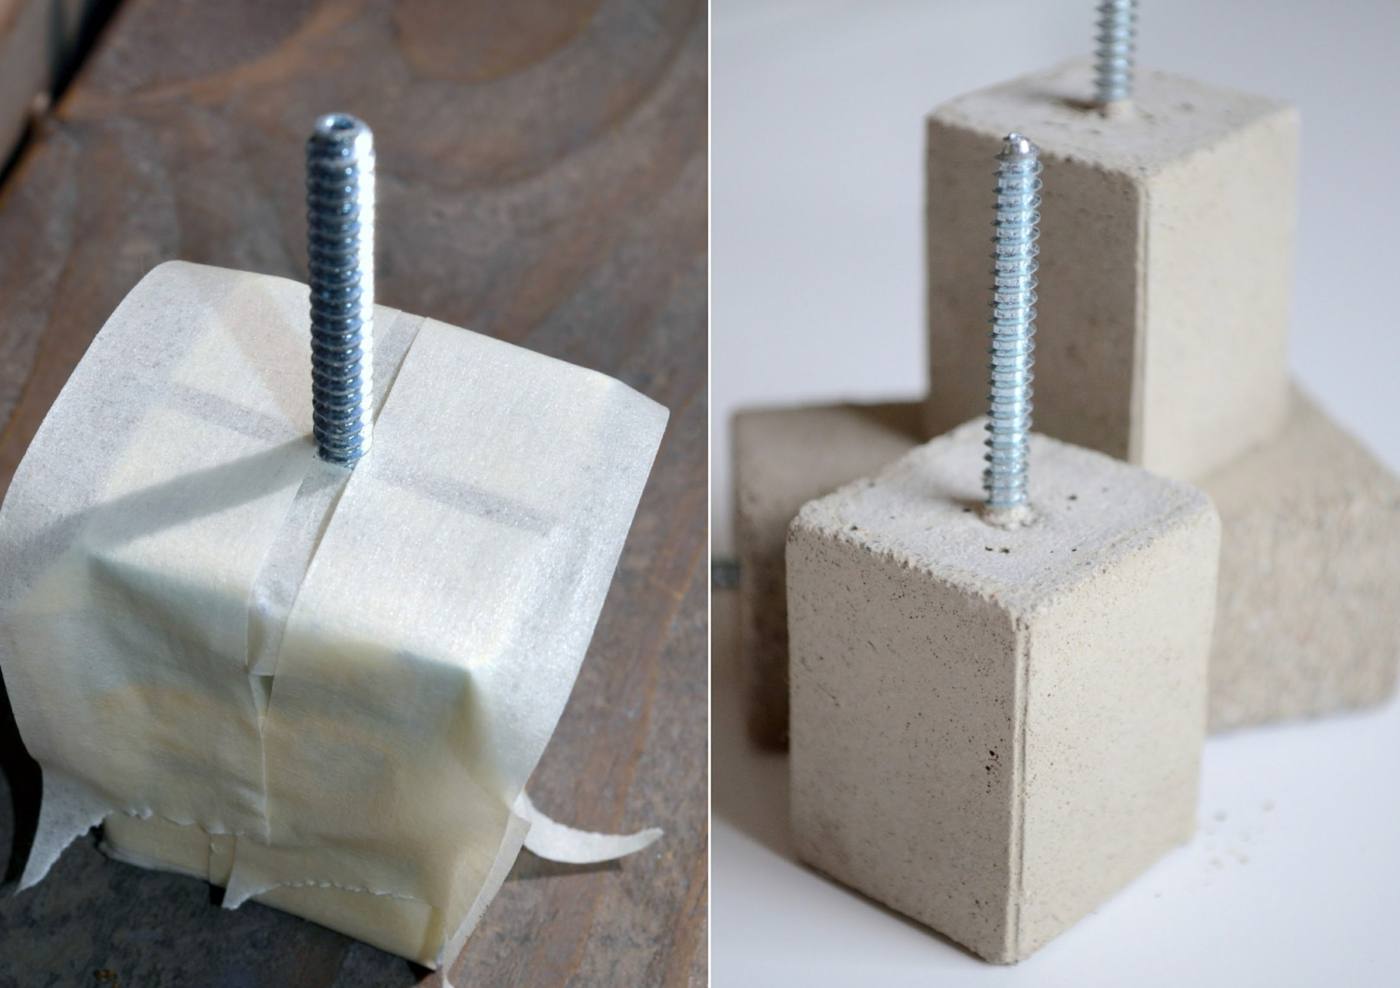
If you miss the concrete and fill the molds with it. By knocking on the desk a few times, you can remove any air bubbles. Then insert the screws into the center of the mold, cover with paper tape and let the concrete harden. Depending on the brand and the art, it can take several days. Then remove the shackles and decorate the cabinets and drawers with the hand-held grips.
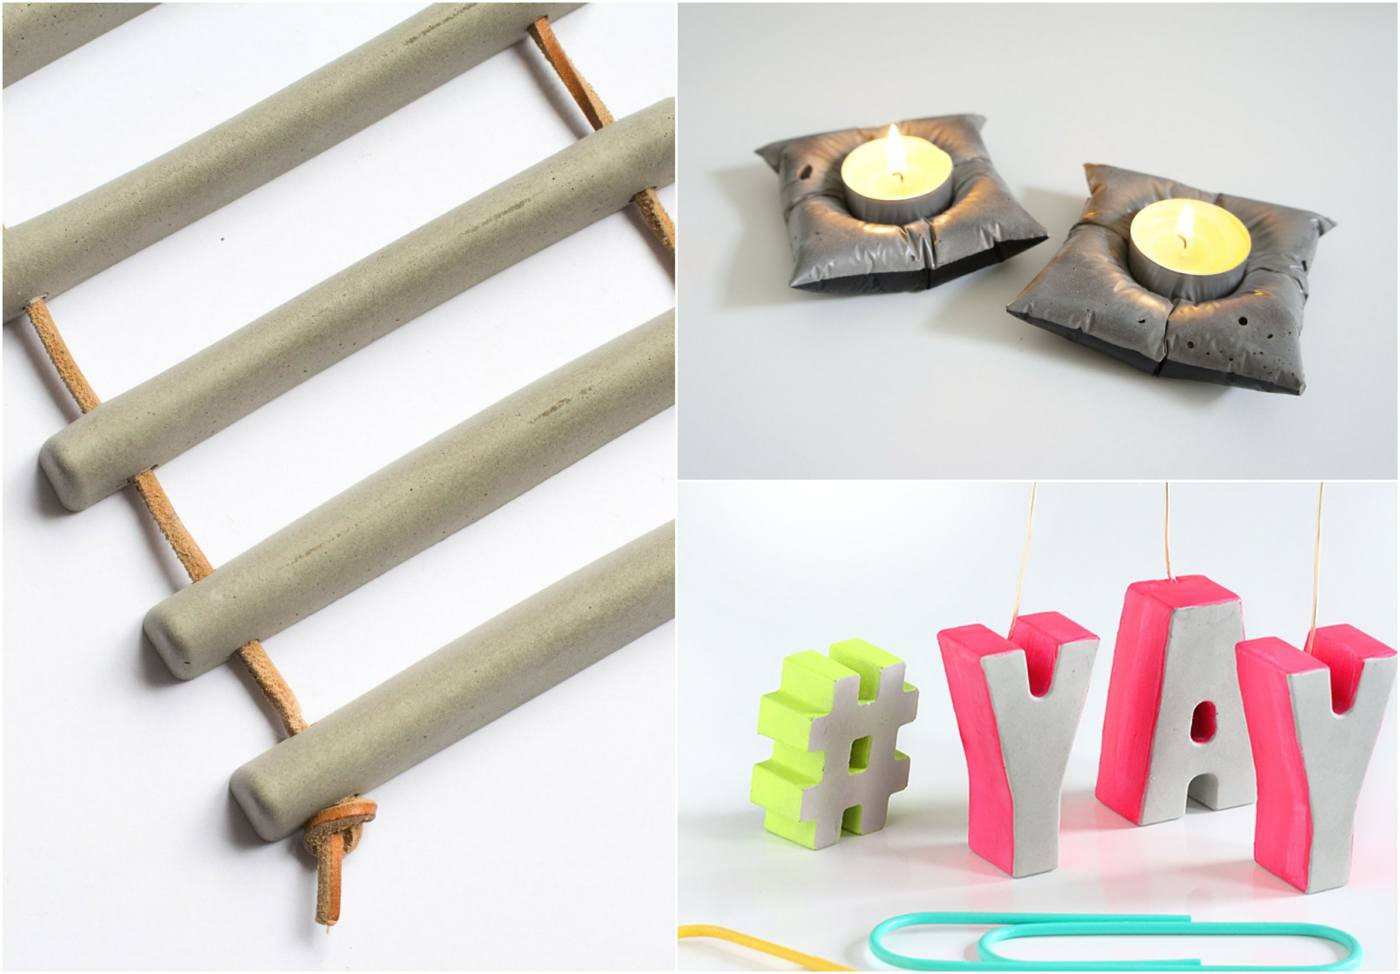
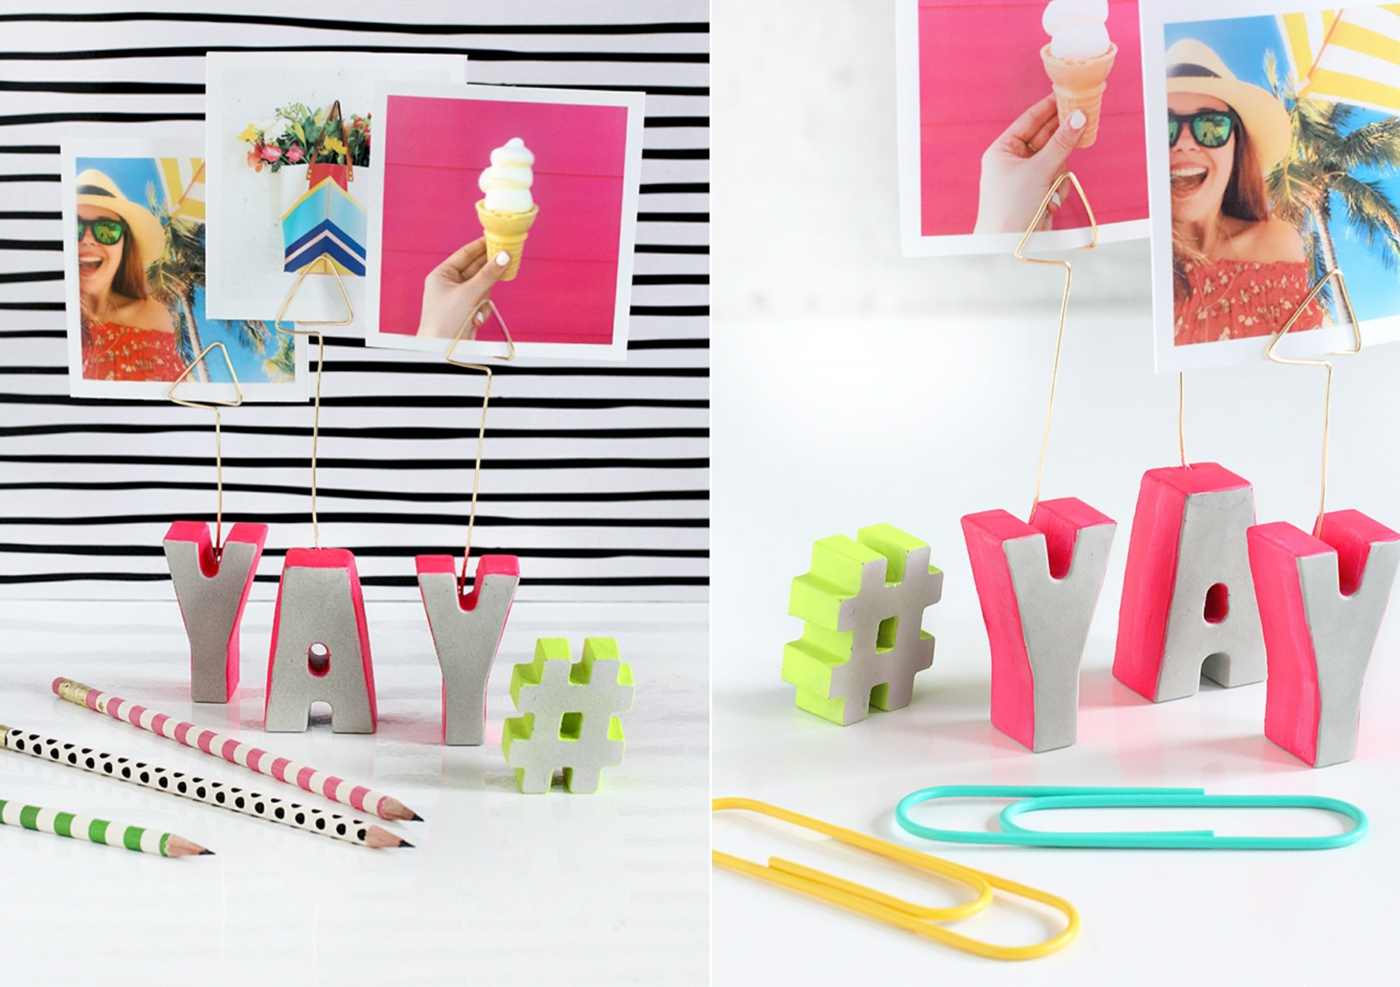
Wire and concrete for making photo booths
- Bastel-Beton
- Silicone backform (for example, with letters, but other forms are possible)
- Wire in any color
- Schwammpinsel
- (Neon) Farben
- Zange
- Klebeband
If you make photo frames with concrete, you will not be able to decorate your own desk just yet without giving them. Take a relatively long piece of wire to make and shape it with the help of the tongue and at the end of a triangle, followed by a wider, larger one. Of course, other forms can also be chosen. The wire should be long enough to be able to integrate well into those forms. Knit the long end as seen in the picture, then the knick is stuck to the upper end of the lettering with adhesive tape and the wire can be supported at one point of the lettering.
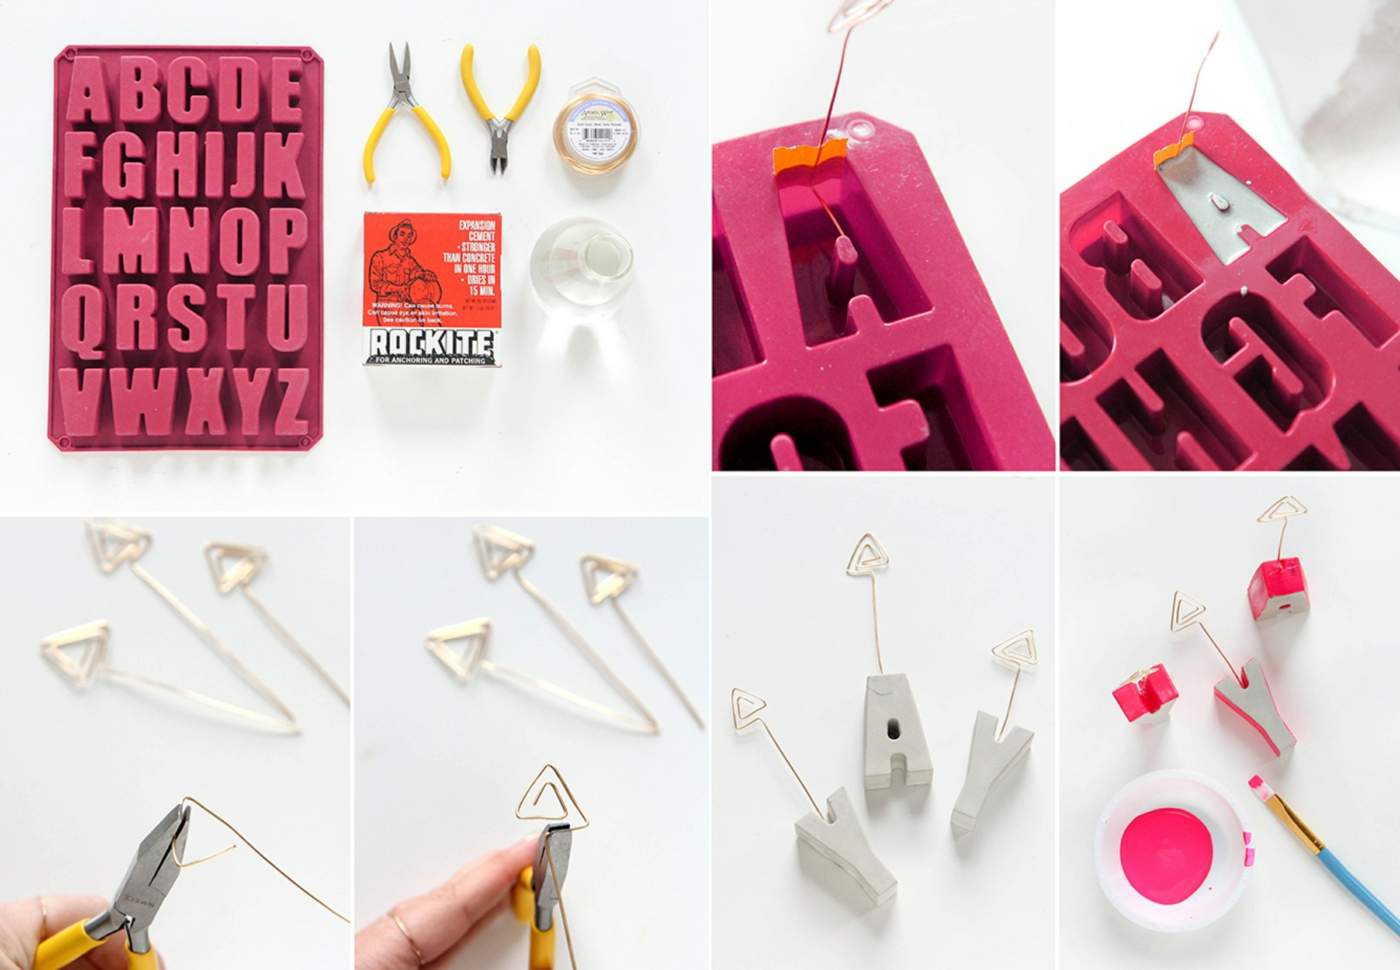
If you mix the concrete so it is thick as a pudding and pour it into the mold. Let them be hard as long as they describe on the packaging. Take the concrete letters out of shape, place them upright on the table and bend the wire upwards. You can now paint and shape the photo holder to Believe. As soon as the color is dried, the photo holder can be set up and sent with a photo or notepad.
Tipp: If you still use the shapes you can use, it can also be achieved by simply inserting the finished curved wire after the concrete.
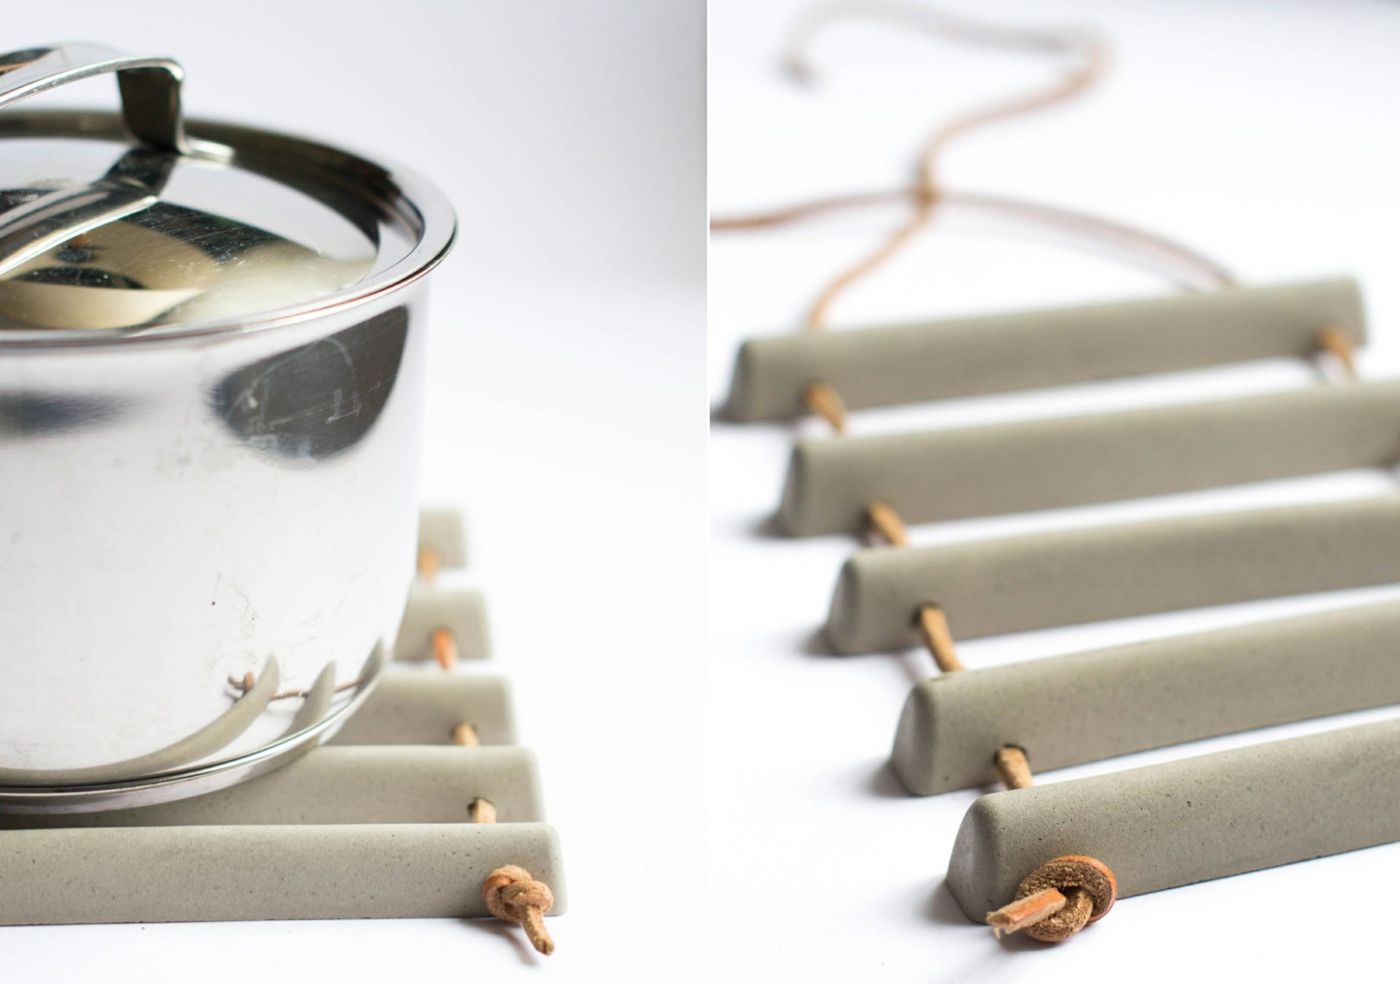
Original top character sets with cement
- Beton
- Ice cube shape for rods (e.g. "plastic" by Ikea)
- Lederschnur
- Blu-Tack (or any other brand such as UHU patafix)
- Schere
- small knife
- 2 transparent straw neck with sufficient large diameter, which fits through the leather cord
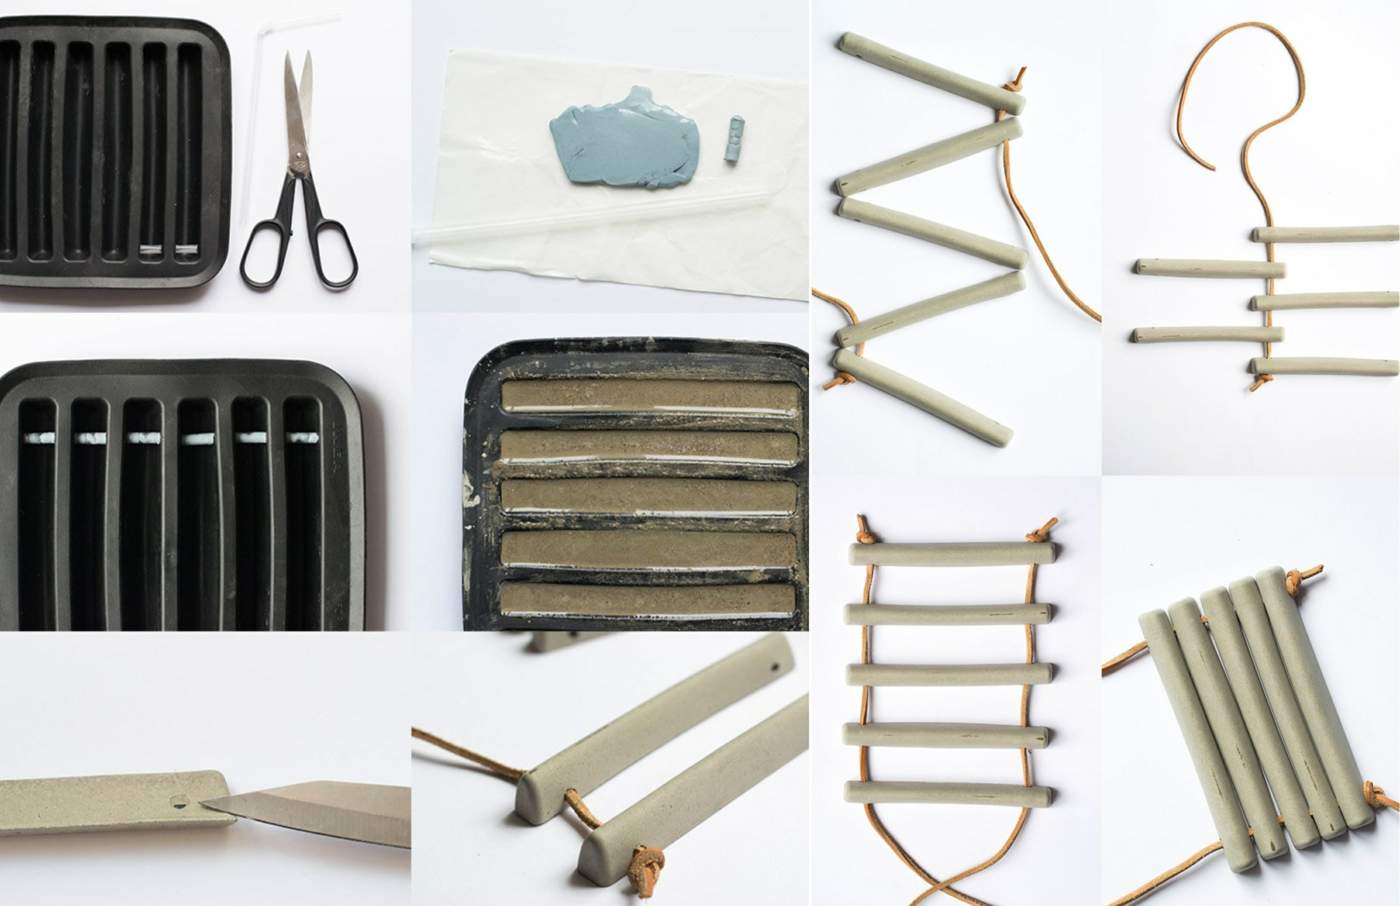
A sophisticated, but also very useful and decorative idea, you can make with concrete, by following this guide for many top-notch sets. Both straw halves cut first into small pieces, which are as long as the ice cube forms are spread. These fill you with the blu-tack, as they become more stable. In this way, the glue on both sides should give some consideration. Then you lay the pieces that you see in the picture on both sides in the shape. Do you realize that they are at any height at equal heights and remain above and below any freestanding space that can be filled with concrete. Der Kleber makes sure that the pieces are fixed and not slippery when pouring the concrete. Remove excess adhesive easily.
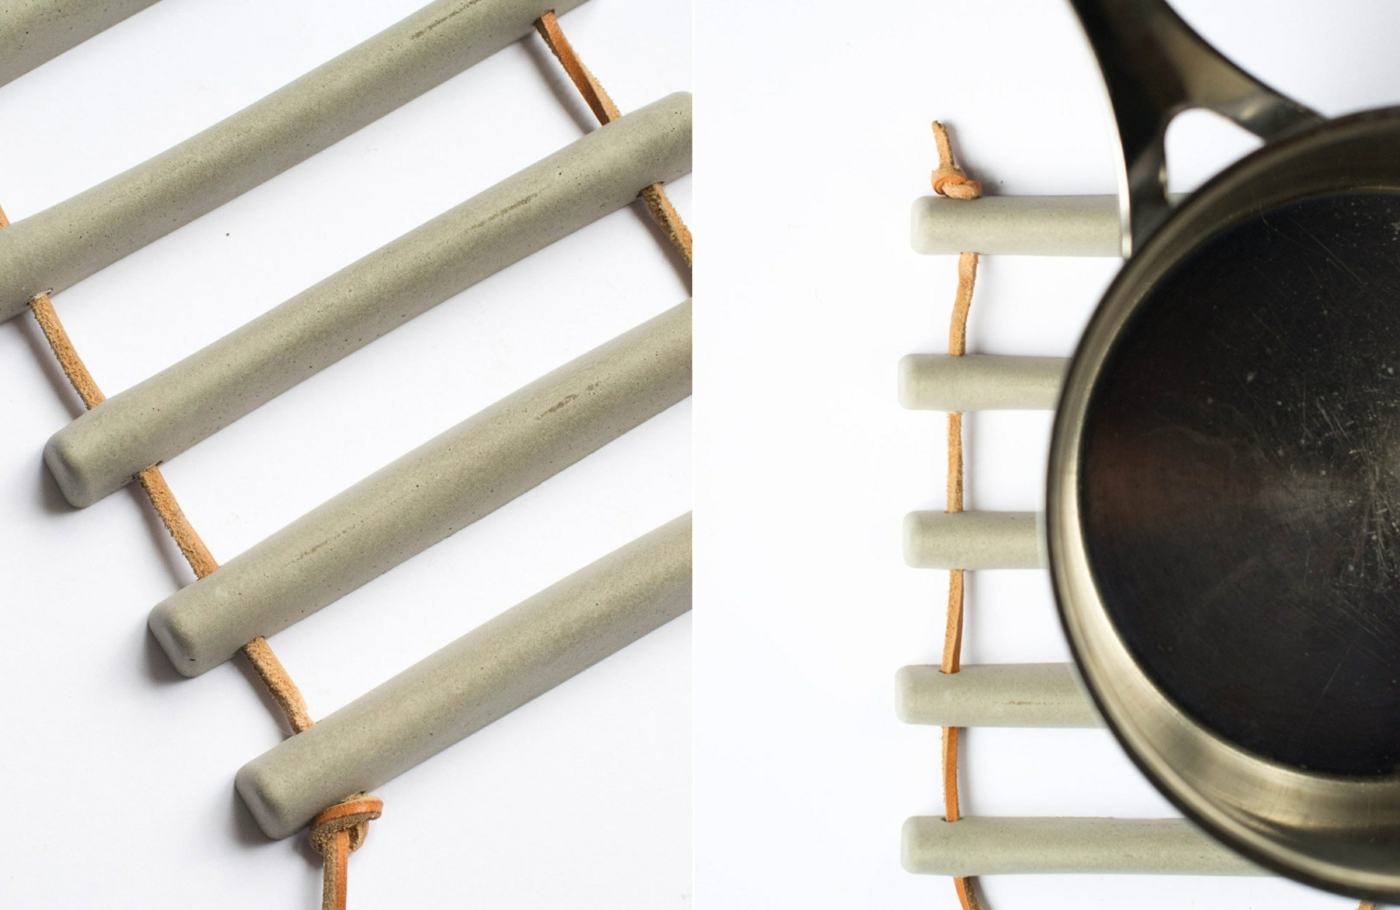
Now you miss the concrete that manufacturers recommend and fill the molds. It is important that the straw is completely covered with concrete. Nowadays, you often knock the mold gently on the table, as the air bubbles disappear. The less air bubbles remain, the more stable the translators will be. Should you fall off a straw straw, you can easily reinsert it. Then let the concrete set for several days. Stays at room temperature, it is recommended to cover with foil to store the moisture. This prevents the concrete from being torn. Then, take the rod out of shape, remove it with the aid of the knife, the stick (which can remain in the straw) and fasten the lead cord. Tie the knots and you're already done!
Tipp: Alternatively to the steps with the straw, you can also cast the rod and the holes later carefully with a drill.
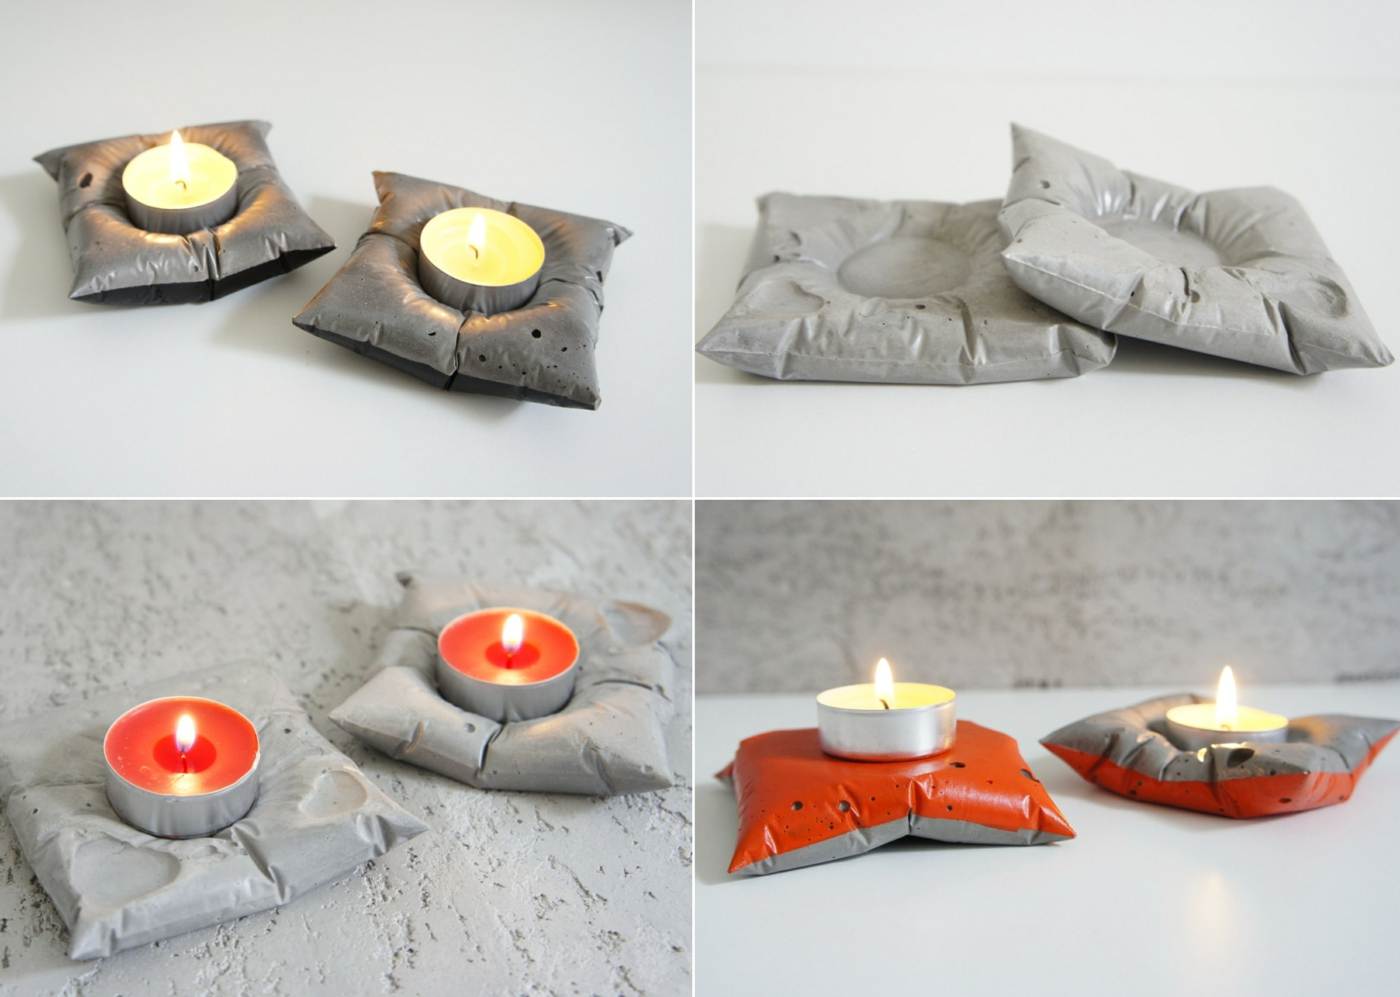
Concrete mixes for making pillows
- Bastel-Beton
- a bowl for mixing
- itwas stirring (fork, paddle, quirl, etc.)
- knits Adhesive tape
- Wearable plastic in any size
- smaller ball or tealight
Very fast and easy to let such incredible pillows as candle holders with concrete. All you had to do was mix the concrete and fill the plastic bag. The concrete should be filled in about as thick as peanut butter and the bag to 3/4. Seal and shake the plastic and knead the concrete for a while to remove the sheets.
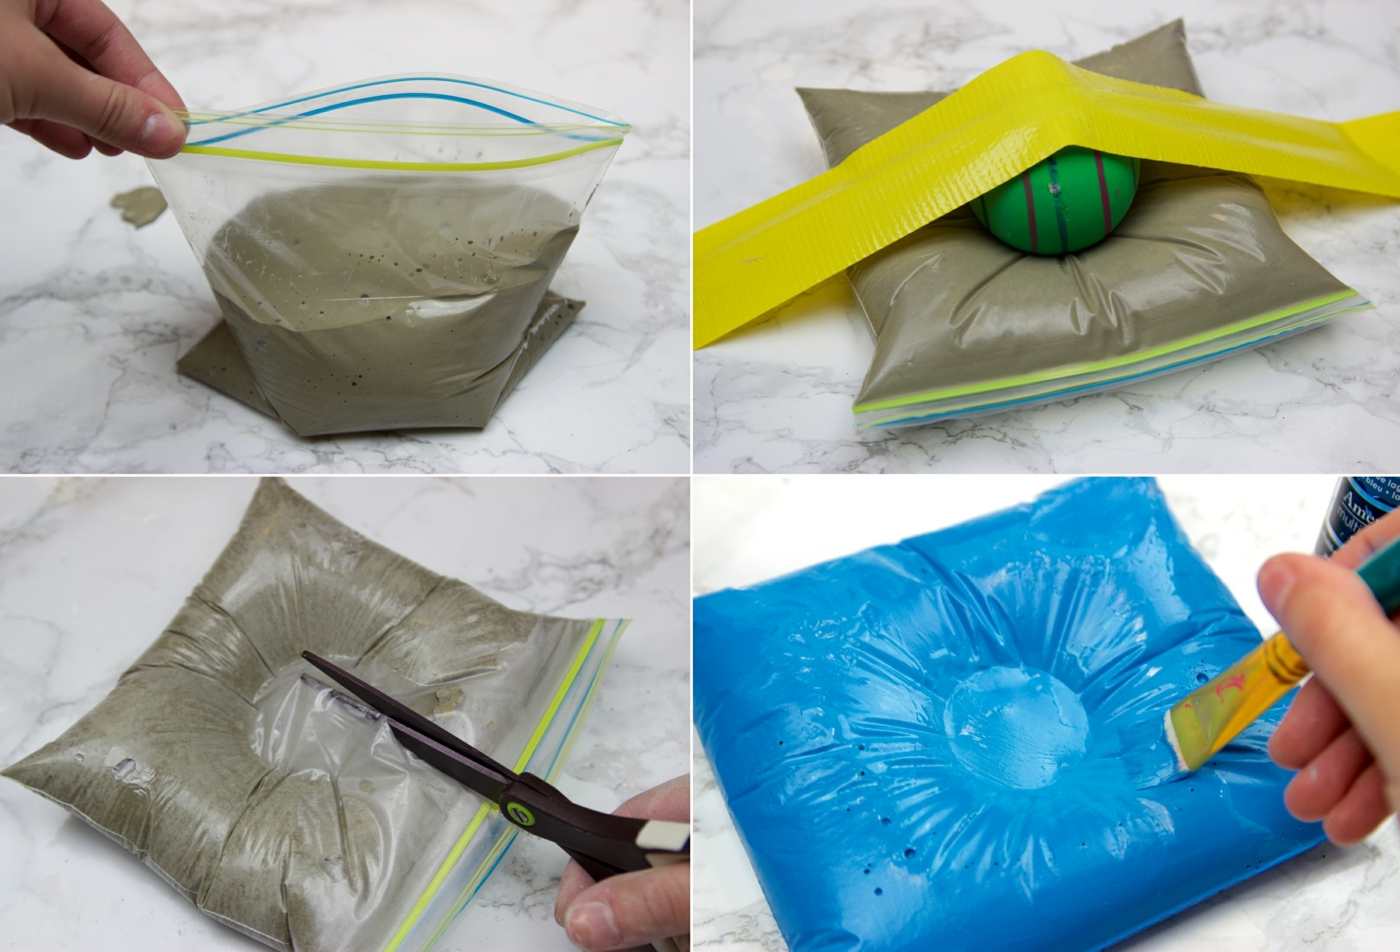
Lay a ball in the middle and push it in with the aid of the adhesive tape in the concrete, so that a bullet is formed (which is why it is important that the nozzle is not completely filled, since it is shifted to the concrete). For this purpose you can also use a tealight. Let the concrete dry and finally remove it with the help of a shear bag. If you do, you can paint the candle holder now. Even with the decoupage technique, the concrete pillow looks wonderful.
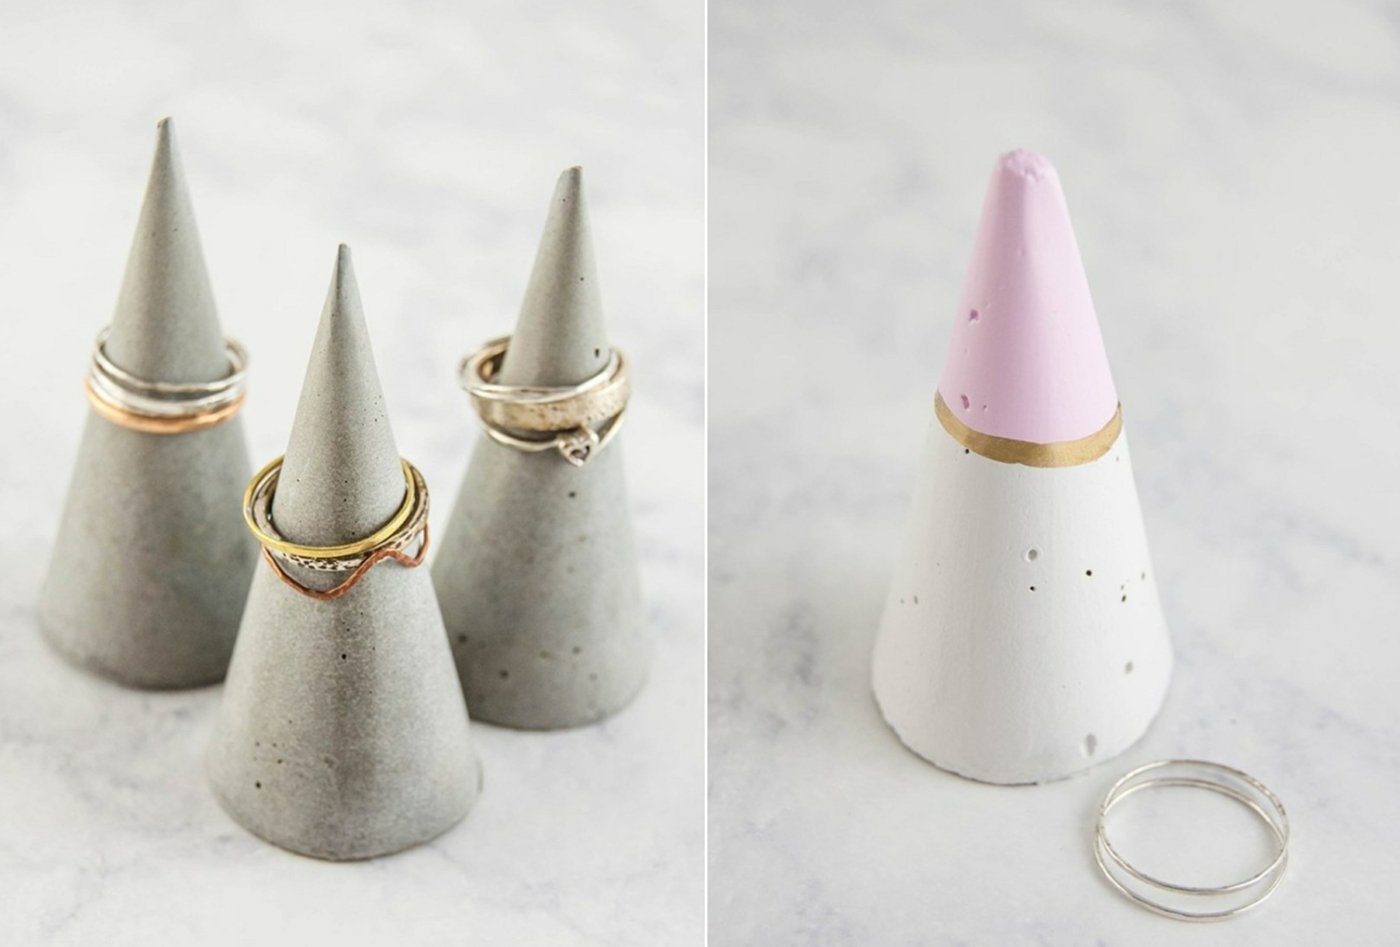
Crafting with Concrete Ring Holder Ideas
- Brick concrete or fine concrete
- transparent adhesive tape
- Chlorobromosilver paper or other glossy paper
- Containers for mixing concrete
- it was stirring
- Cardboard or cardboard box
- Frisch Halte Foil
- Proposal for expressing a cone (see below)
- Teppichmesser
- Schere
- Edding
- optional: Heavy object as weight
Print the proposal from the link below, cut it out and transfer the shape onto the chlorobromosilver paper. Cut out the shape. Form a cone out there, where the beautiful site should still be seen. Glue both ends together with the adhesive tape. This should not overlap or stand out at either end, as this would otherwise be transmitted to the concrete cone.
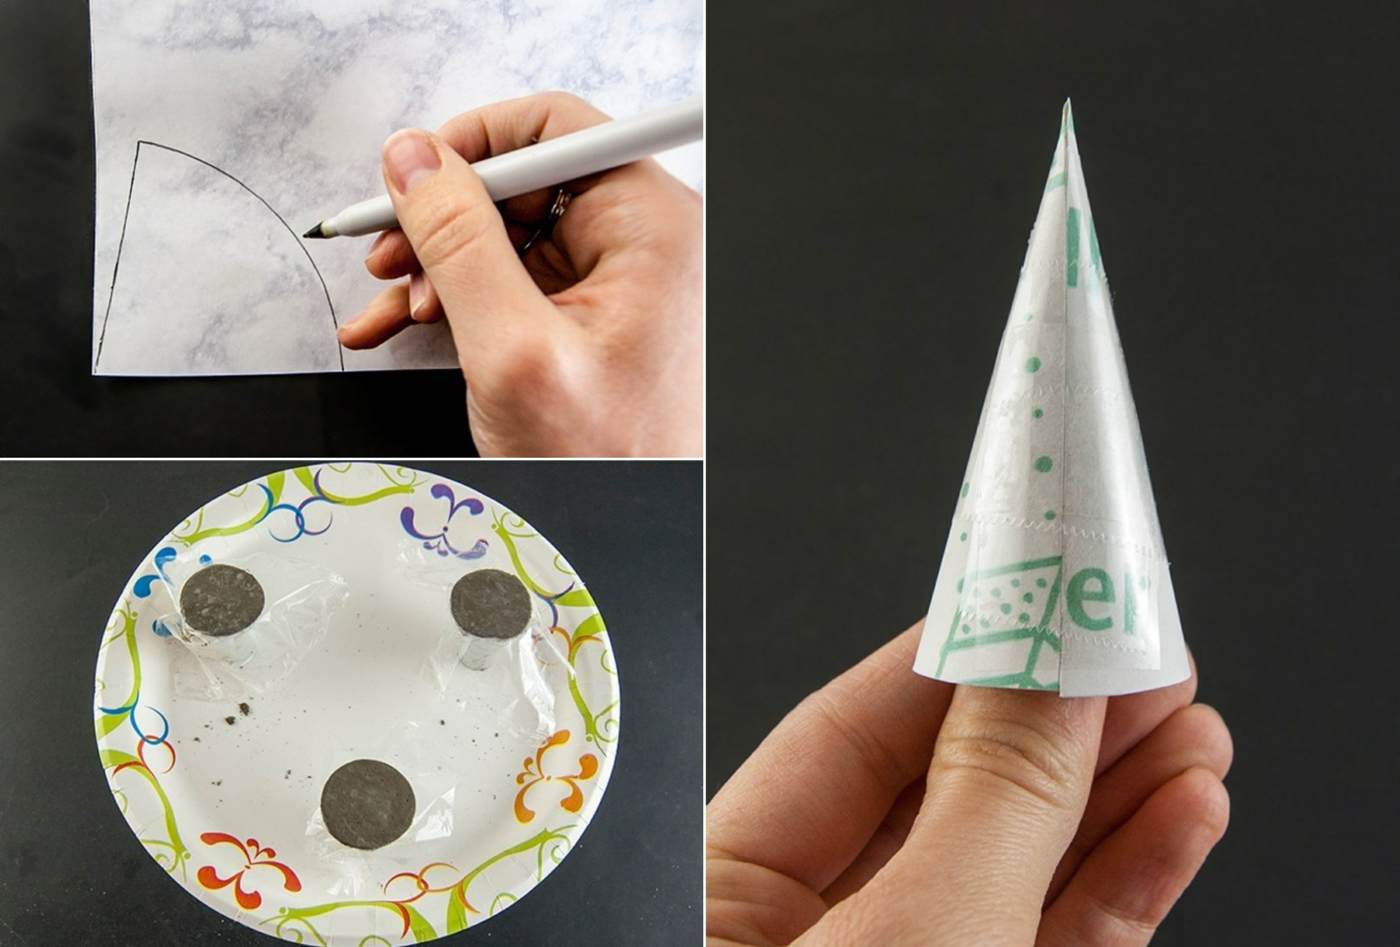
Before you start to concrete with concrete, you still have to prepare a support, in which the cone can still be pulled under the tip with the tip. Take this for the cardboard or a piece of cardboard, in which you cut many holes at the edge of the rim (nevertheless, how many ring holder on once you can repair). The center of the counter is not pierced, as it is placed on a mug or glass. Draw the circles for example with a circle on it and with a smaller diameter than the opening of the cone. With a carpet or craft knife, you can cut out the holes evenly, so that the cone can later also be easily hung hanging.
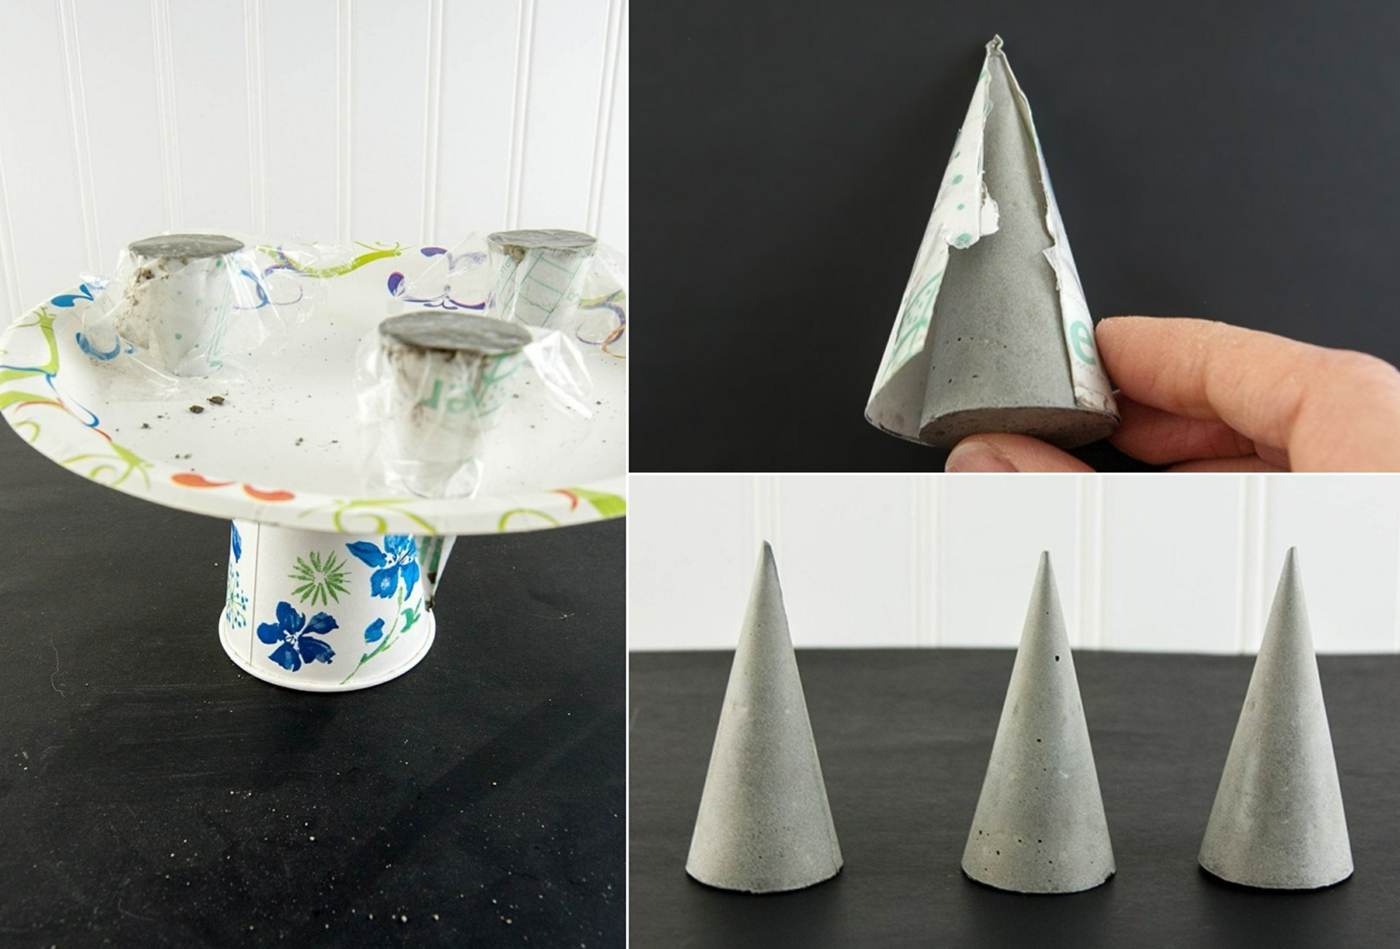
Mix the concrete until it is thick as pudding. If you put a little bit in a cone, shake and knock, to remove the blisters and then run the concrete to the tips and then fill the cone completely, whereupon you shake and knock again. Insert the finished concrete cone into the holes of the counter and cover it with fresh foil. If the counter is jammed, since the weight of the cone is not evenly distributed, you can place another weight on the counter as compensation. If you pull the concrete, you remove the chlorobromosilver paper and paint the finished ring holder.
Cone preliminary to print here.
Smaller Cone here.
The post Was bristling with concrete? 6 Instructions for Easy and Useful DIY Projects appeared first on Deavita.com | Home ideas, design, hairstyles, makeup, lifestyle, health and beauty tips.


