Concrete flower head for indoor and outdoor self-making - 5 effective ideas with guidance

On Pinterest, everything revolves around concrete and according to the theme we have some instructions for concrete flower head DIY for you today. The optically modern material can be used for really any style of design and sometimes together with beautiful plants and flowers to decorate your interior, but also the outside. The tolle in this material is also that it is wonderfully easy to read with your work, so that you can trust yourself craftsmen in the following projects. But simply convince yourself and seek out your favorite flower offer, which you will immediately find again. Lots of fun while crafting!
Make concrete flower pots with muffin molds

- fast drying bricks
- Muffin molds made of silicone
- The cork
- Nagel
- optional laundry-resistant pens for painting
How large the corks should be used for the manufacture of this concrete flower pot depends on the size of the muffin molds you have chosen. The diameter of the cork to the cables should be able to work above and below each 2 cm smaller, in order to work in a cavity. Place a cork on its larger side, shape a cork, insert a nail through both and push the nail completely through the cork.

For example, mix the concrete in a single-glazed glass. The mixture can be calm and liquid, so that it can be better distributed in the form. Then fill in the area between corks and muffin molds and knock out the mold a few times on the table to remove air bubbles and distribute the concrete well. If you let the concrete dry for about 15 minutes, turn the corks a few times to prevent it from sticking firmly to the concrete. Besides, you can easily remove it later.

As soon as any concrete paperwork is dried, you can take them out of the molds and let them cure for a further 24 hours. Then you can still paint them. For example, waxed felt pins were used to reshape the edges, but you could naturally let them fall. The holes in the beds of concrete slab should serve in the future for drainage to avoid water congestion.
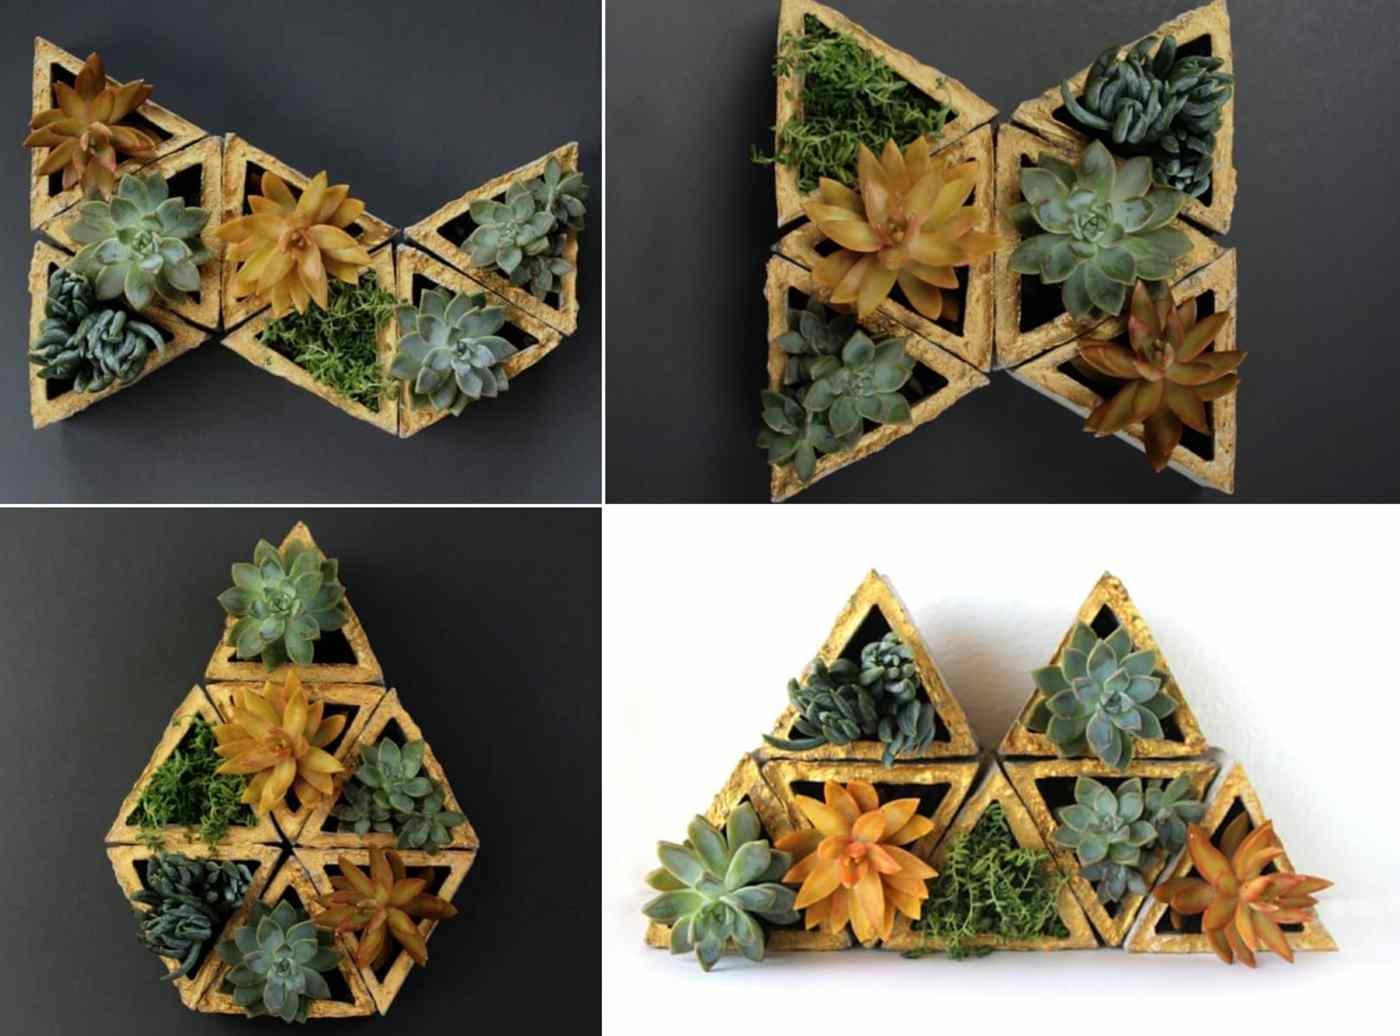
Make triangular flower pots of concrete yourself
- Beton
- Cardboard or paper for molds
- Proposal for expressing molds
- Containers for mixing concrete
- Shears or carpet knives
- Kleber
- Klebeband
- Handschuhe
- optional golden color
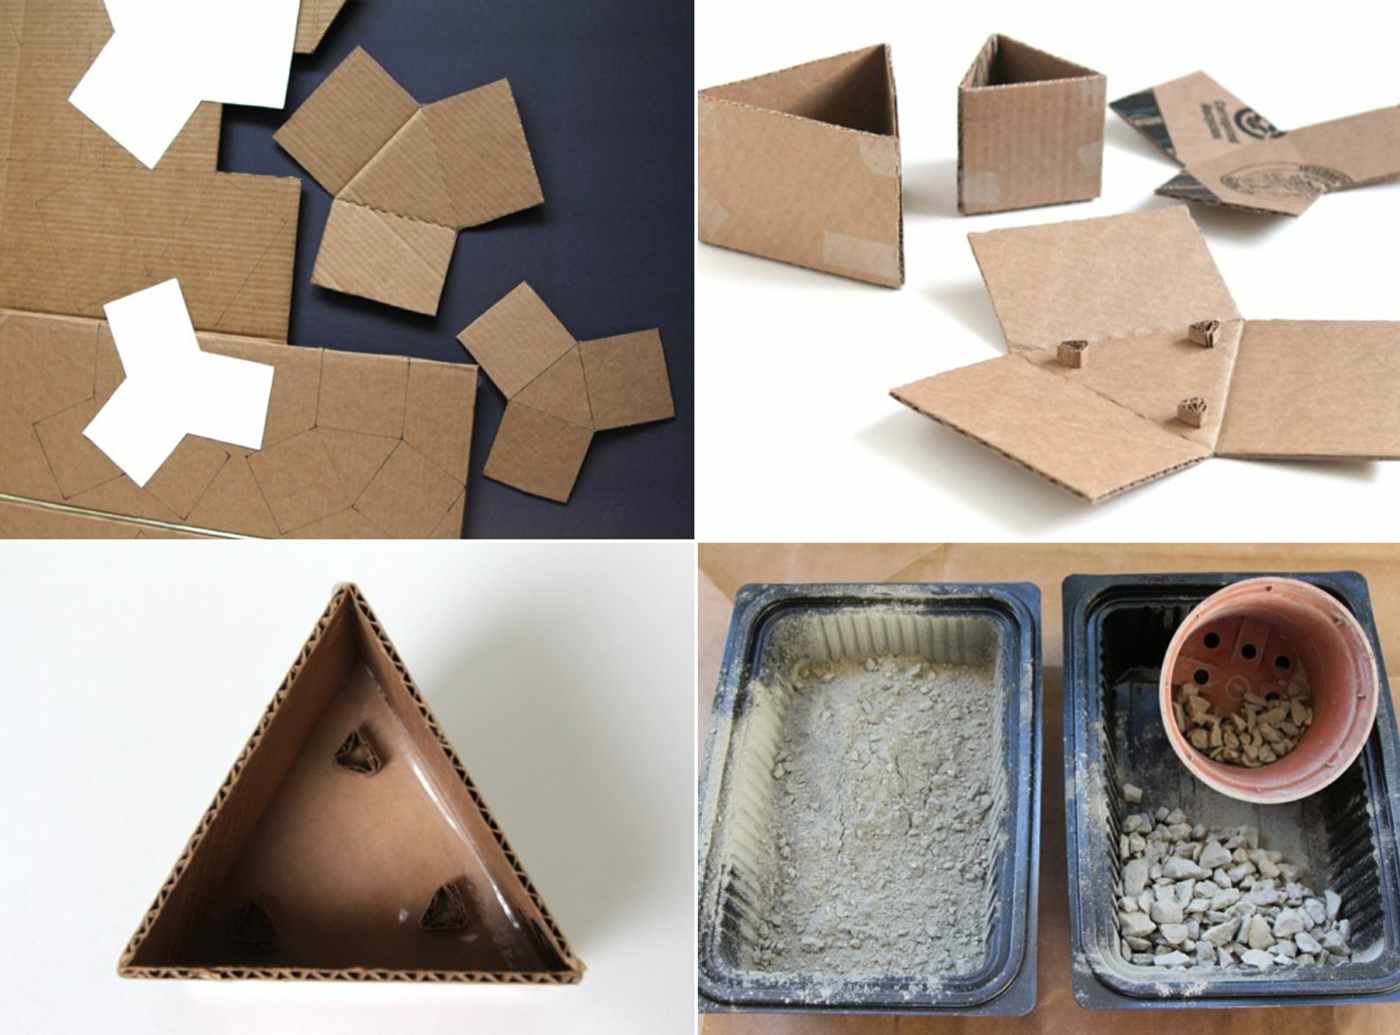
Who would it be if you made the flower pot made of concrete? In triplicate form, more peaks allow you to assemble interesting and numerous variants. For the restoration you must first prepare the mold. Print and cut them out, transfer them to the cardboard box and cut them out again. If you fall into the predetermined areas and stick the pages together until you get a triangular shape. Inside, you seal the edges with adhesive tape to prevent the run-out of concrete. Make out of thin cardboard strips or rings, which you can see in the picture and stick them inside the big triangle. In this way, you can only get holes for drainage, but also openings for hanging. Finally, you have a large and a smaller shape.
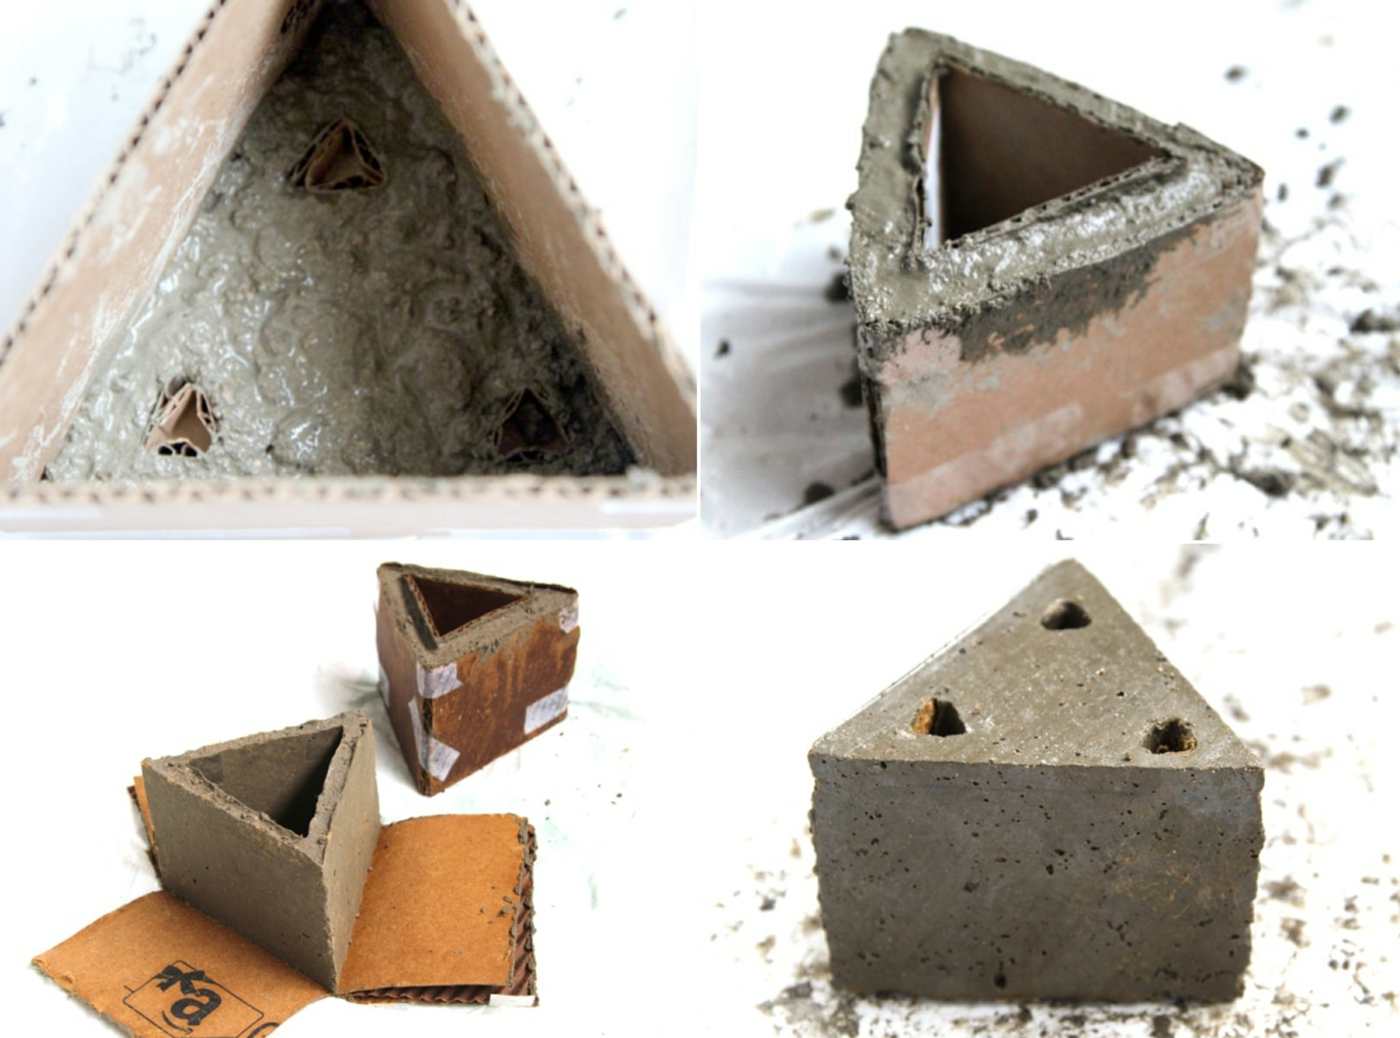
Now mix the concrete and fill with the bottom of the big triangles to the height of the rings. The concrete should be said to be liquid at best, in order to be better cast. Imagine just the small triangle and you think it really stands midway. They can also fix it with a tape of all three sides in the big triangle. Now pour the concrete between both triangles to work the side walls. With a toothpick, stock or ice sheet, you can evenly distribute the concrete according to the molding.
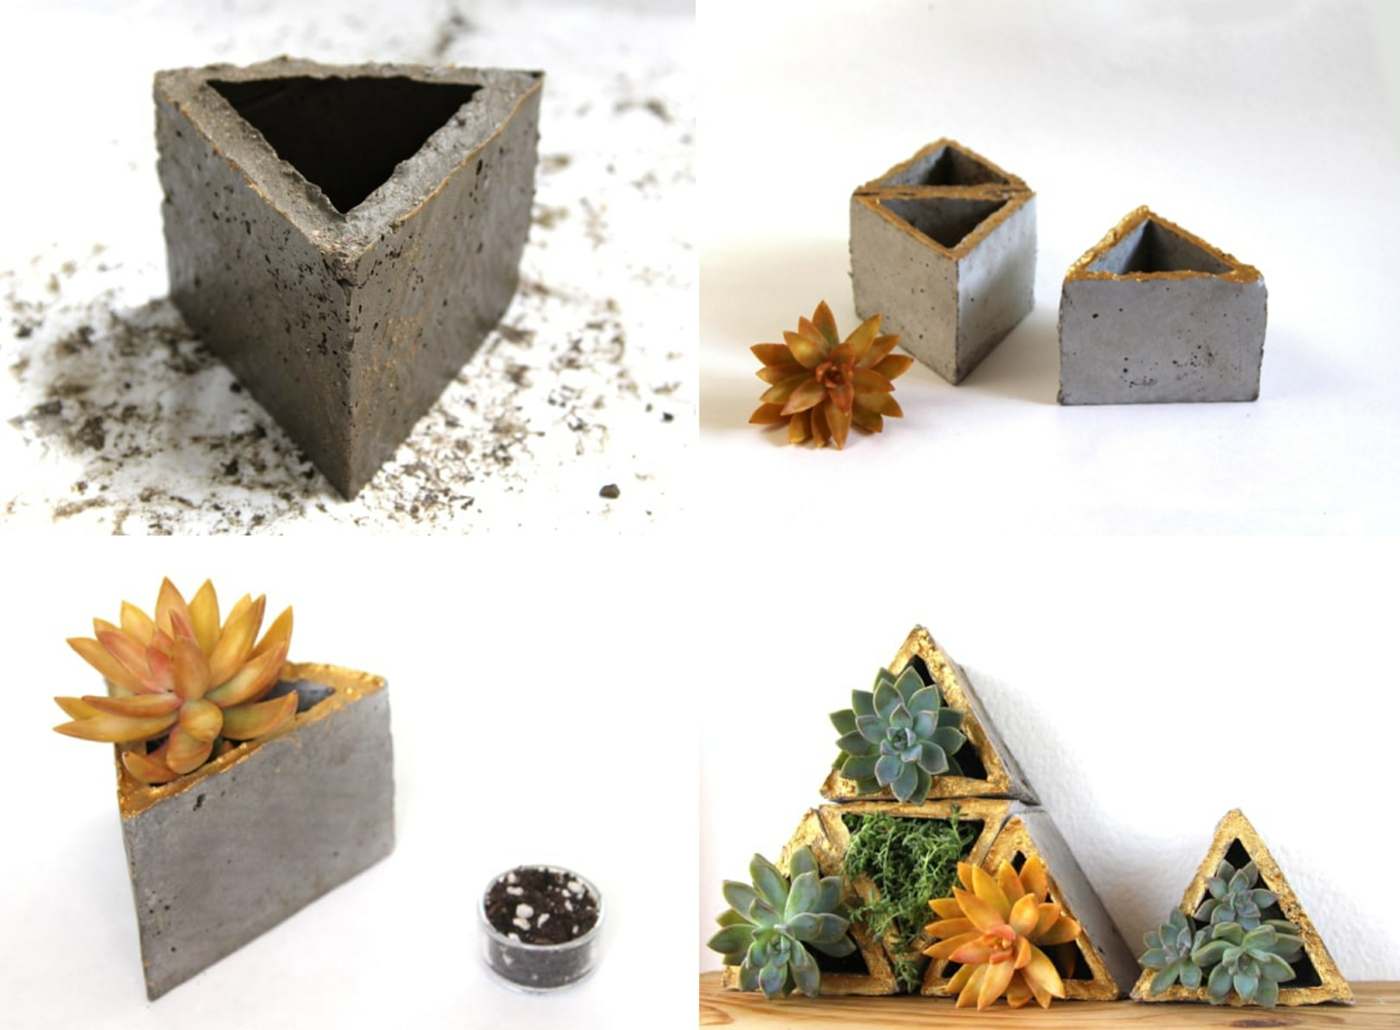
Let the concrete flower head dry long enough. To prevent cracks, you should spray the concrete daily with water and cover it with a plastic sponge or foil. Once the concrete has dried, remove the paper. Since concrete is very alkaline and can affect the plants negatively, you can also put any concrete flower pot in the water for a day. Then, let the pipes dry and already you can plant them freely. If you do, you can even paint and shape it once and for all.
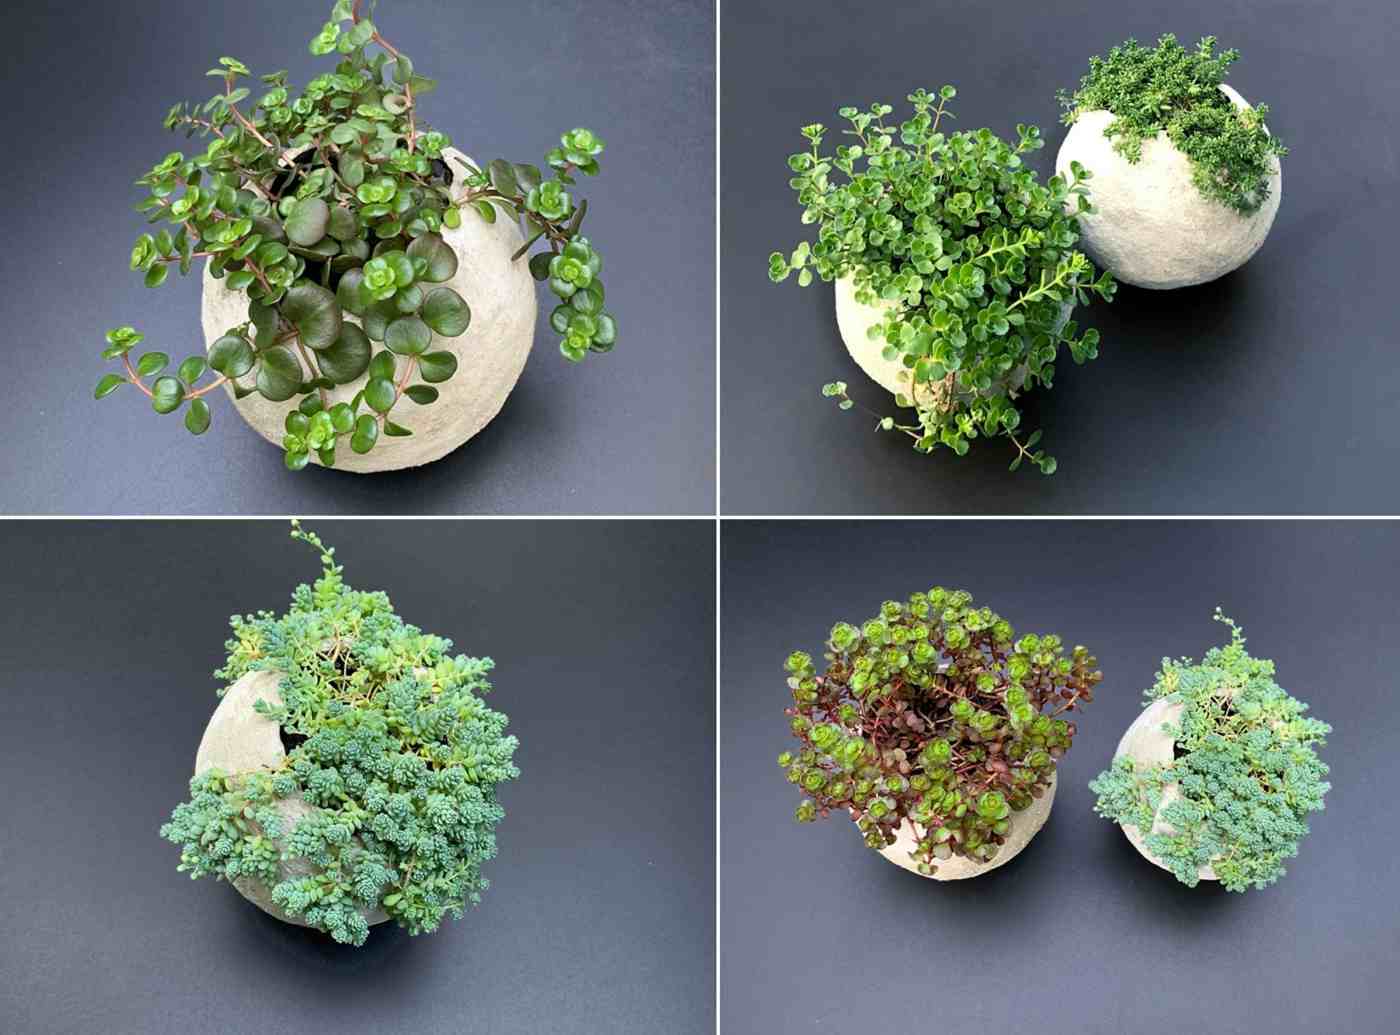
Make bullet-shaped plant danger yourself
- round balloons with your favorite size
- fast-drying cement
- Gummihandschuhe
- all metal sieve with hook
- Container for mixing
- Plastiktüte
- old wash bowl
- 3 wattage bars
- large sponge
- Pflanzen
- suitable blooms for those of your chosen plants
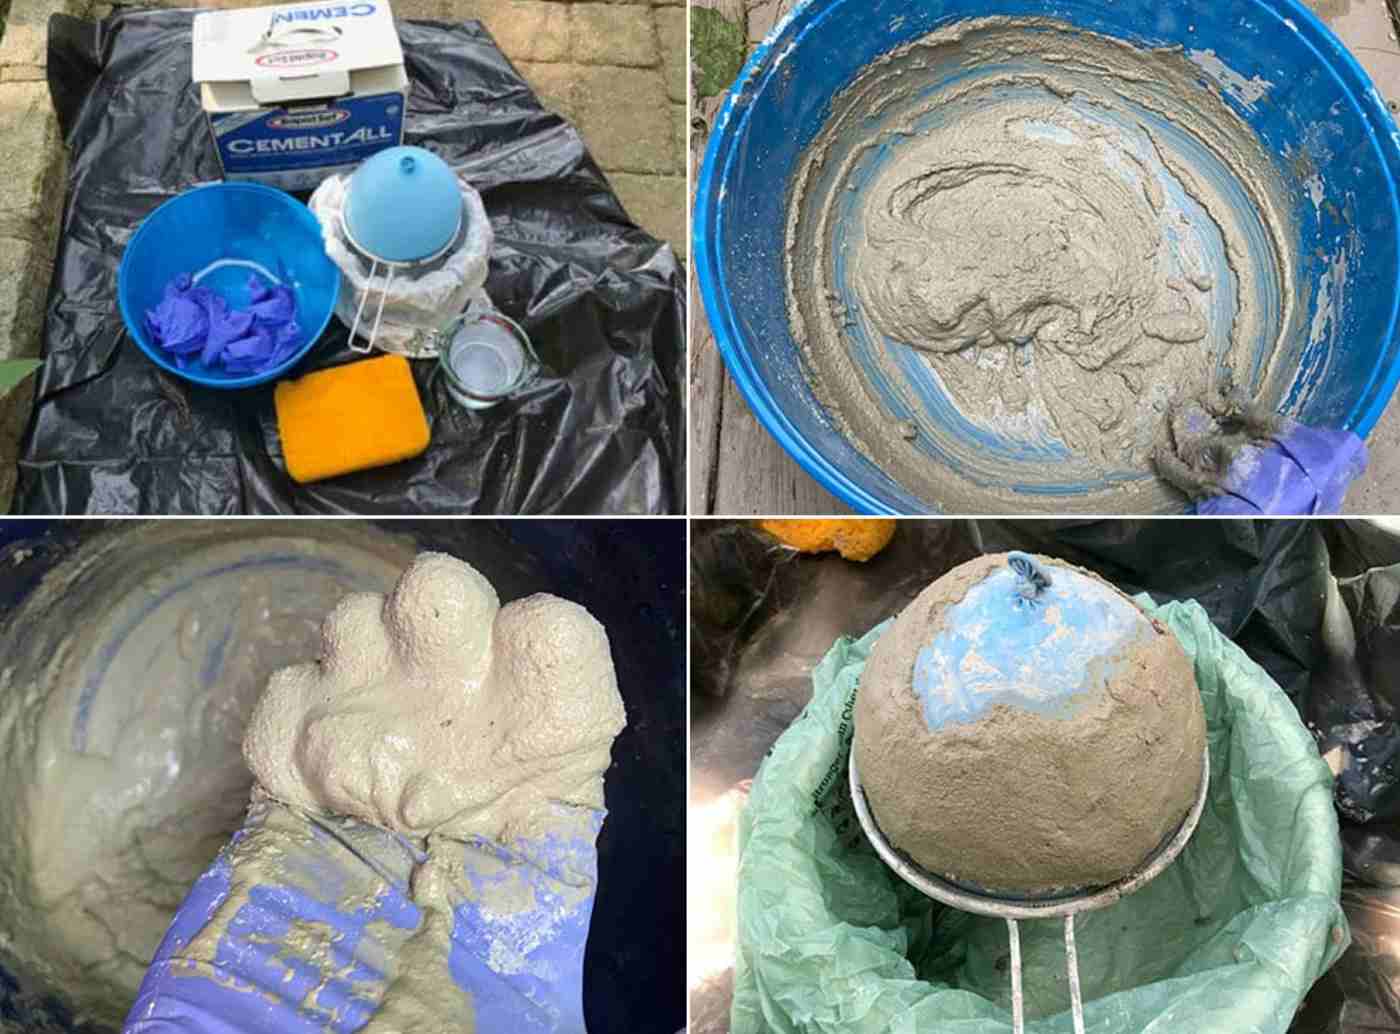
Blow up a balloon in the desired size. Do you think that the concrete flower head will still be larger due to the thickness of the concrete. Empty the washing bowl with the plastic bag and fill a glass of water, which you should have with a cloth. Now mix the concrete in the pre-sealed container. Use these gloves as they will best blend in with your hands. Pour about 120 ml of water into the mixing tank and pour in and out of cement until you reach a thick liquid that you can carry on the balloon, without slipping on the concrete. Try off and on easily by riding the balloon. If you are not satisfied with the consistency, simply remove the concrete, put it back in the container and, depending on the need for water or cement.
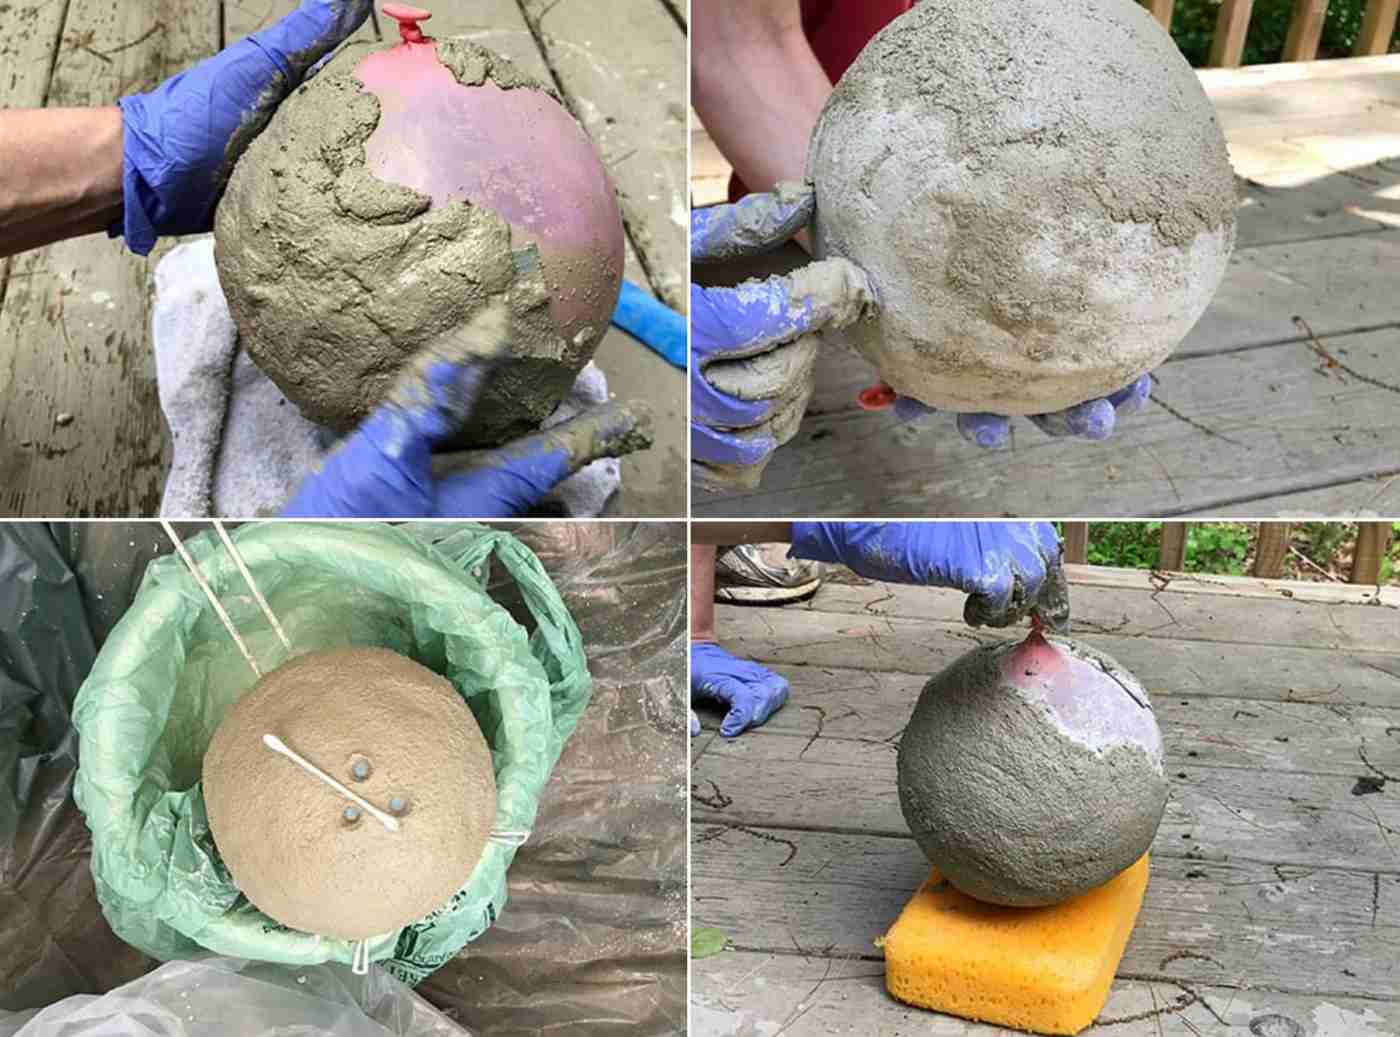
Hang it yourself in the washbasin and begin to cover the balloon on one side with the pile of concrete. The area with the knots should remain free, as this will be the opening of the concrete flower shed, in which you plant the plants. This should not be too small. When drying the concrete while working, simply wet your hands or your hands with water. Go over to the other half and try to make a smooth transition. If you need a break, you can fly the balloon on the sponge.
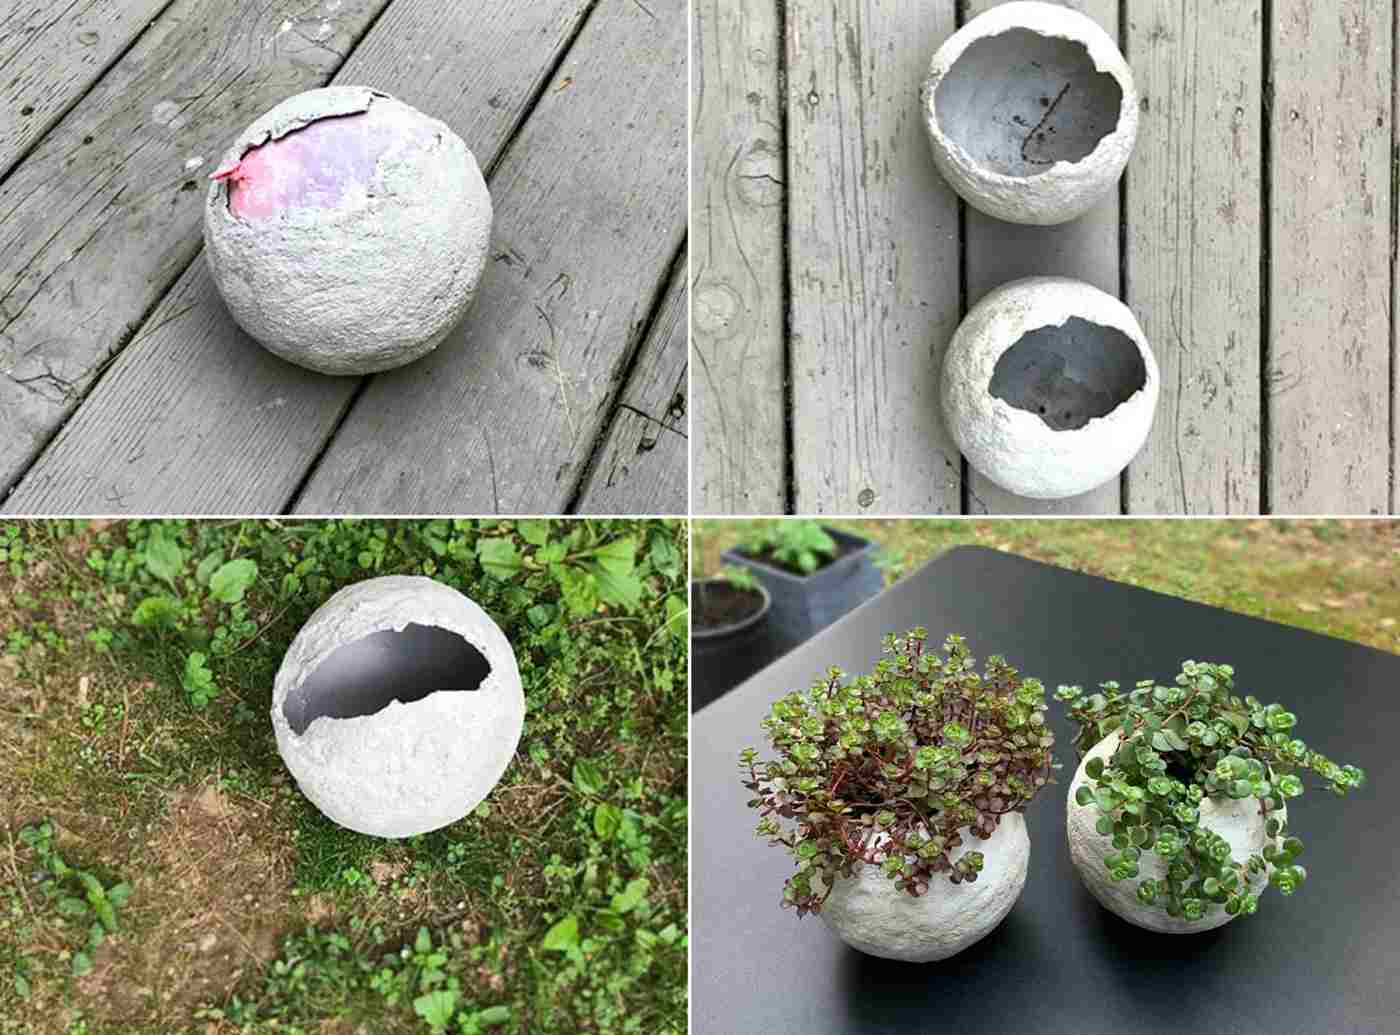
Finally, moisturize a cotton swab and form three drainage holes in the lower area (knotted). Let the balloon now be on the sponge or hard. Imagine if you were in the sun, but then you could expand and collapse the balloon. After about one to two hours you can disassemble and remove the balloon. If you need to re-mix concrete and reinforce the concrete floral surface, you can distribute it inside and make the walls thicker. Do not, however, close the holes! As soon as this concrete is dried, you can plant your plants.
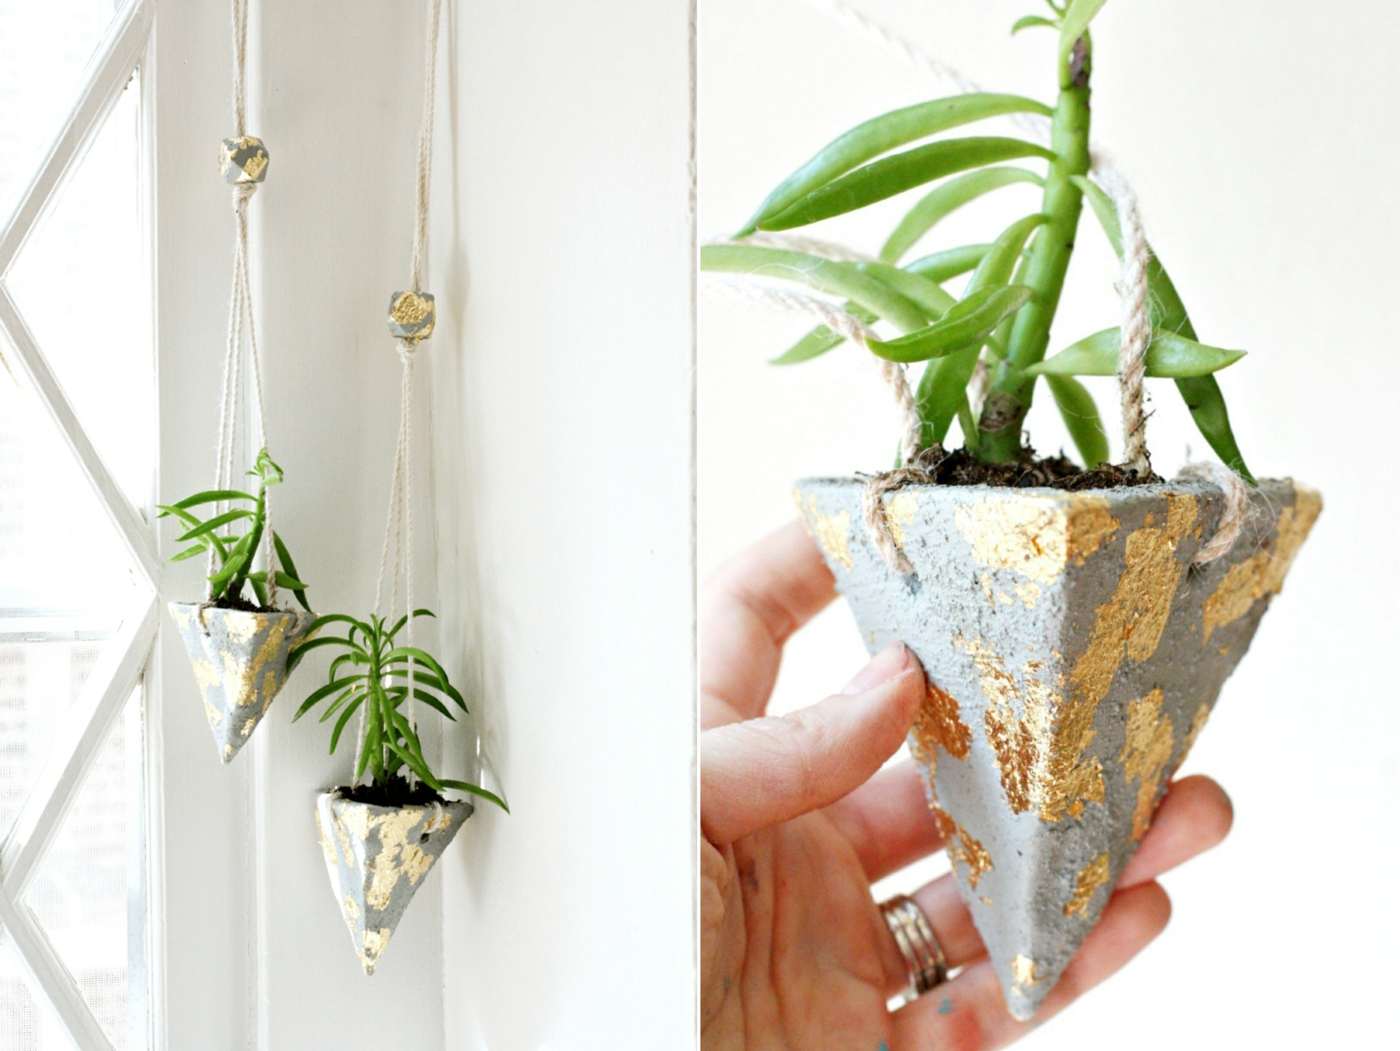
Blumentopf pendants in Concrete optics
- Color in Concrete Optics
- Bastelton in front of the oven
- a thin rope
- Holzperlen
- Strohhalm
- a plant and flower garden
- optional: golden color or sheet gold and brush for the design of concrete flower head
If you are not prepared with concrete, you can also easily imitate this modern material instead. An example of such a concrete flower pot is this model from Bastelton. Roll out the tone until it has a thickness of about 6 to 12 mm. Then cut out the desired shapes. For the model from the example, you need three roughly equal triangles (you can cut out and use a preliminary paper or cardboard in advance).
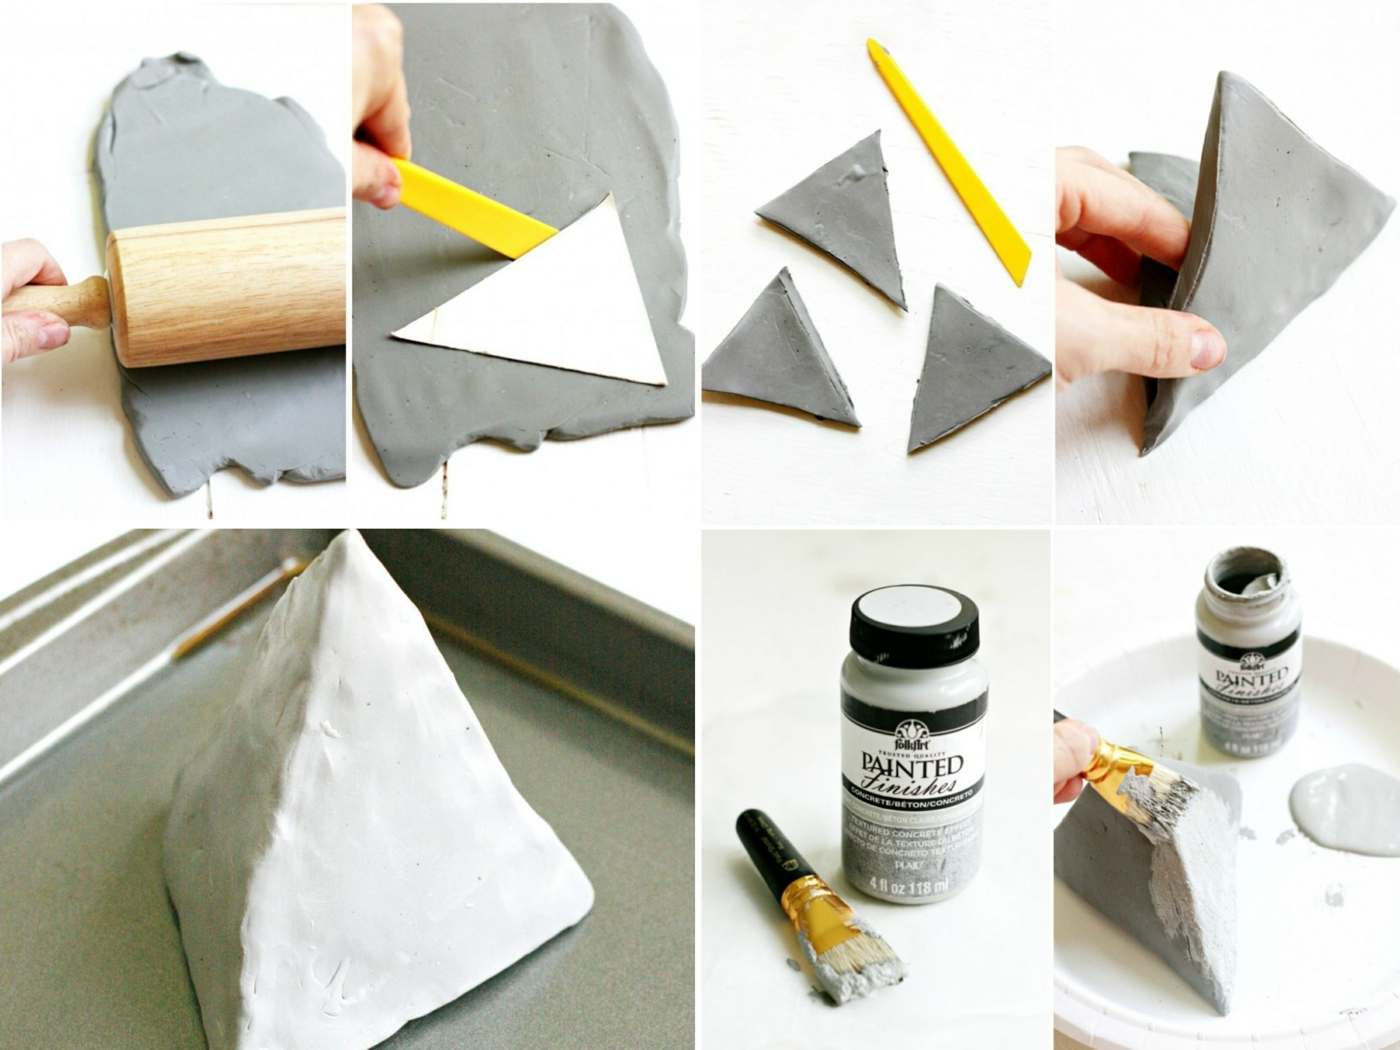
You firmly attach the three sides to the concrete flower head by pressing the sides together and erasing the tone. In particular, it is important to avoid joints and to work smooth transitions, as these future transitions are waterproof. You can now stitch each hole with the straw in each side, with the aid you can hang the pipes later. Imagine the shape of a pyramid on a back sheet and back according to the manufacturer's instructions.
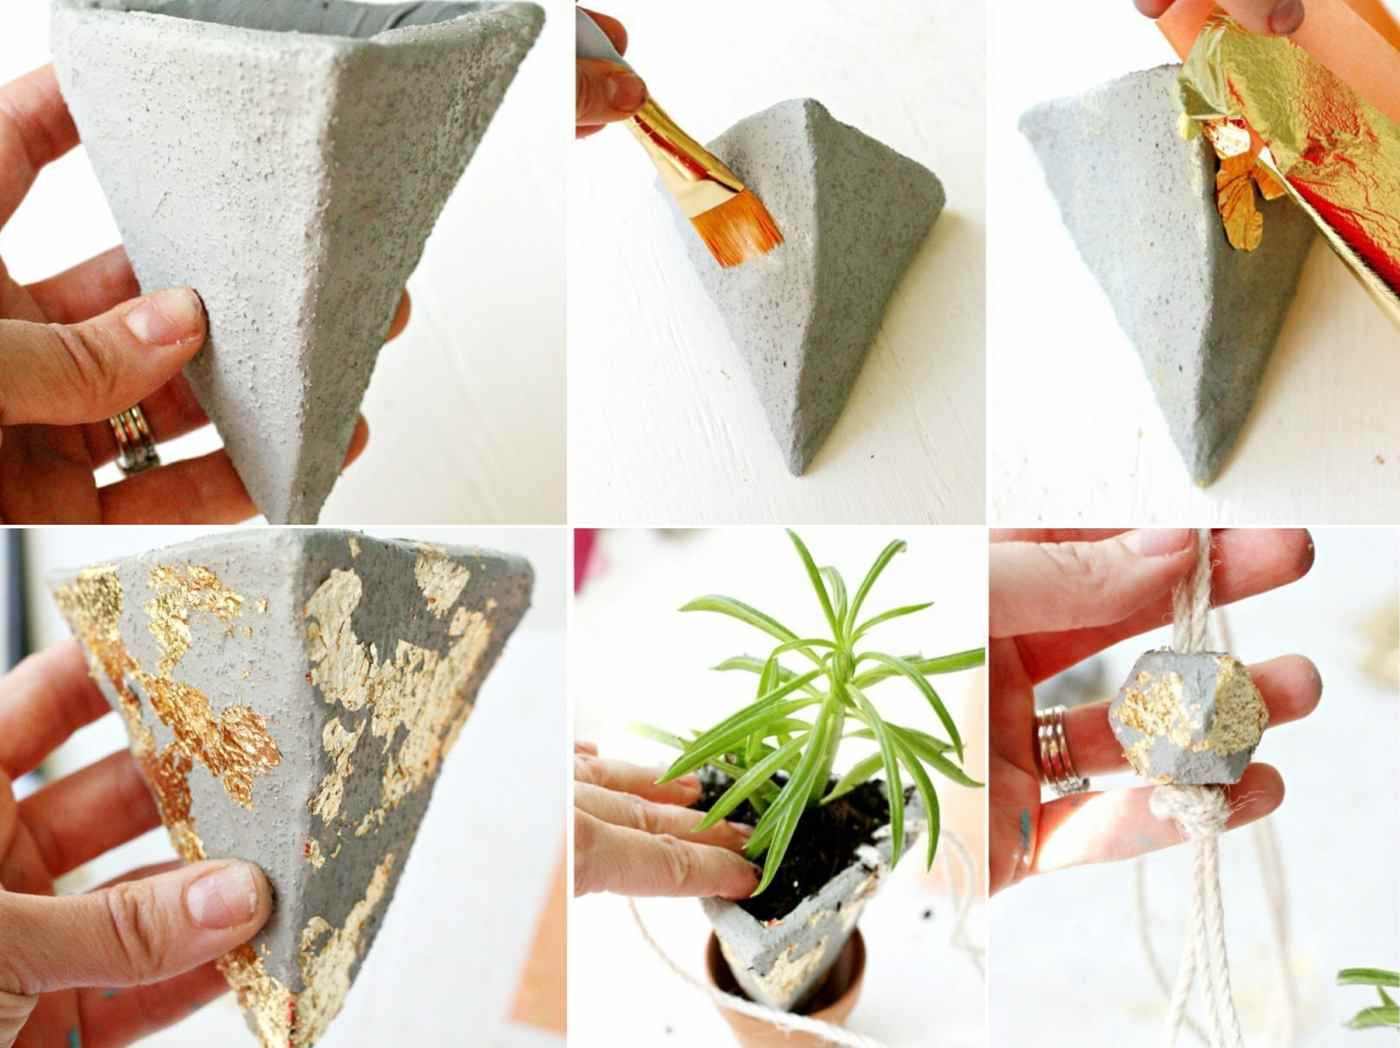
As soon as the tone has cooled down, you can adjust it with color and work with modern concrete optics. After you have dried the color, you can make the concrete flower head at any time. For example, Blattgold is used, but even color is suitable. Finally, you still tie the rope to any length at all three sides. Above, where the three pieces come together, they tie a knot and adorn it with a wooden bead that you can align with the color and the leaf gold as well. Are you still planting the plants and you're already done!
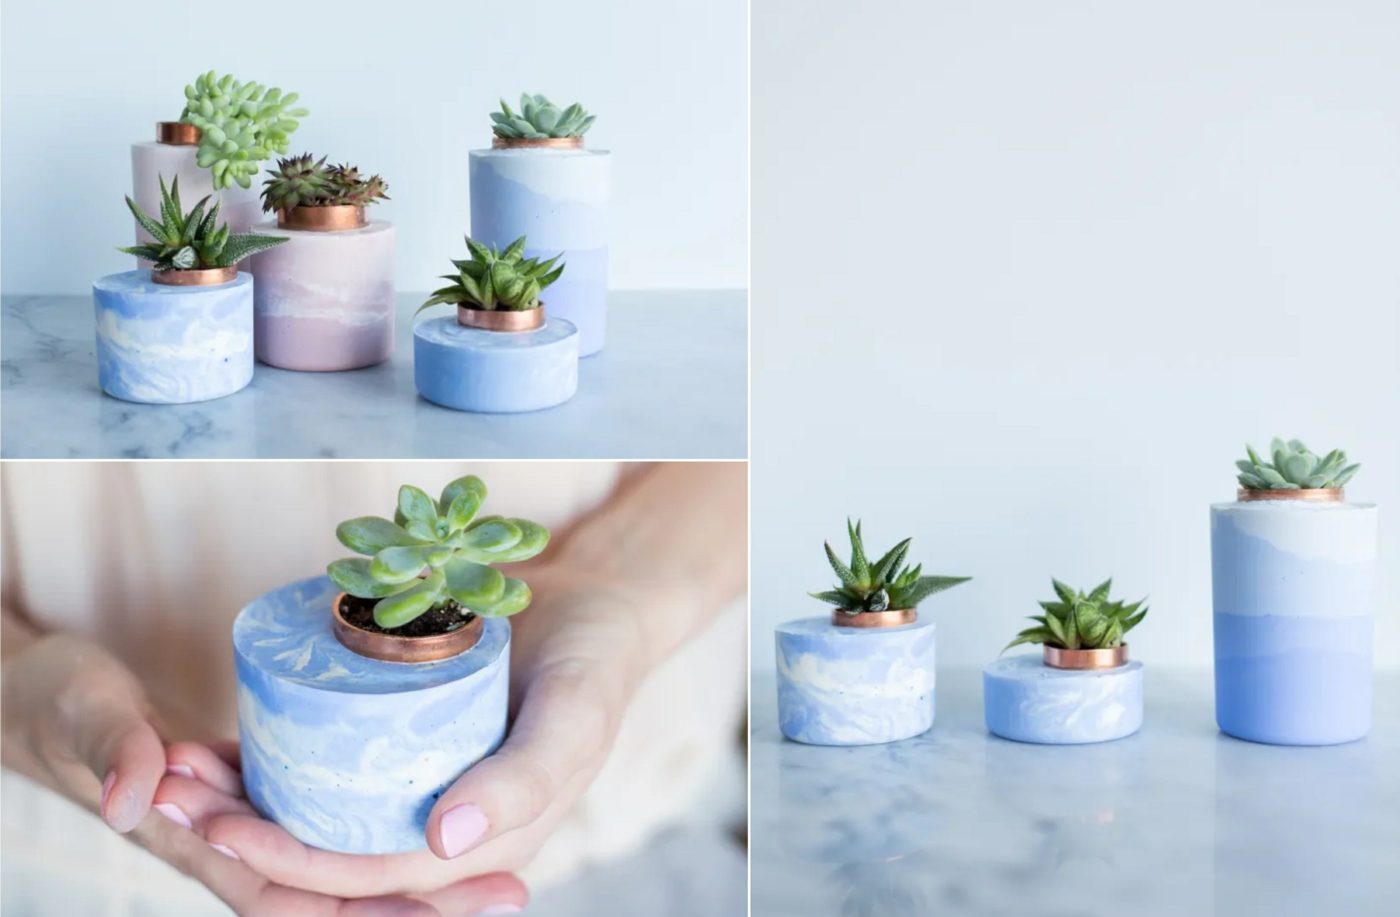
Homemade Concrete - Mini-pots in marble look
- Crafted or fine concrete
- Betonfarbpigment
- Color pigments for concrete
- Chlorine or alternatively short copper tubing
- Container in any size and shape as mold
- Sukkulenten
- Handschuhe
- Container for mixing
- alter spoon or other utensils to stir
With gloves you need to mix the concrete according to the manufacturer's instructions. Take one of your favorite items and paint them in another container with color pigment. Then use the non-stained concrete to stain and stir only few males to create the marble effect. They can also continue without dyeing.
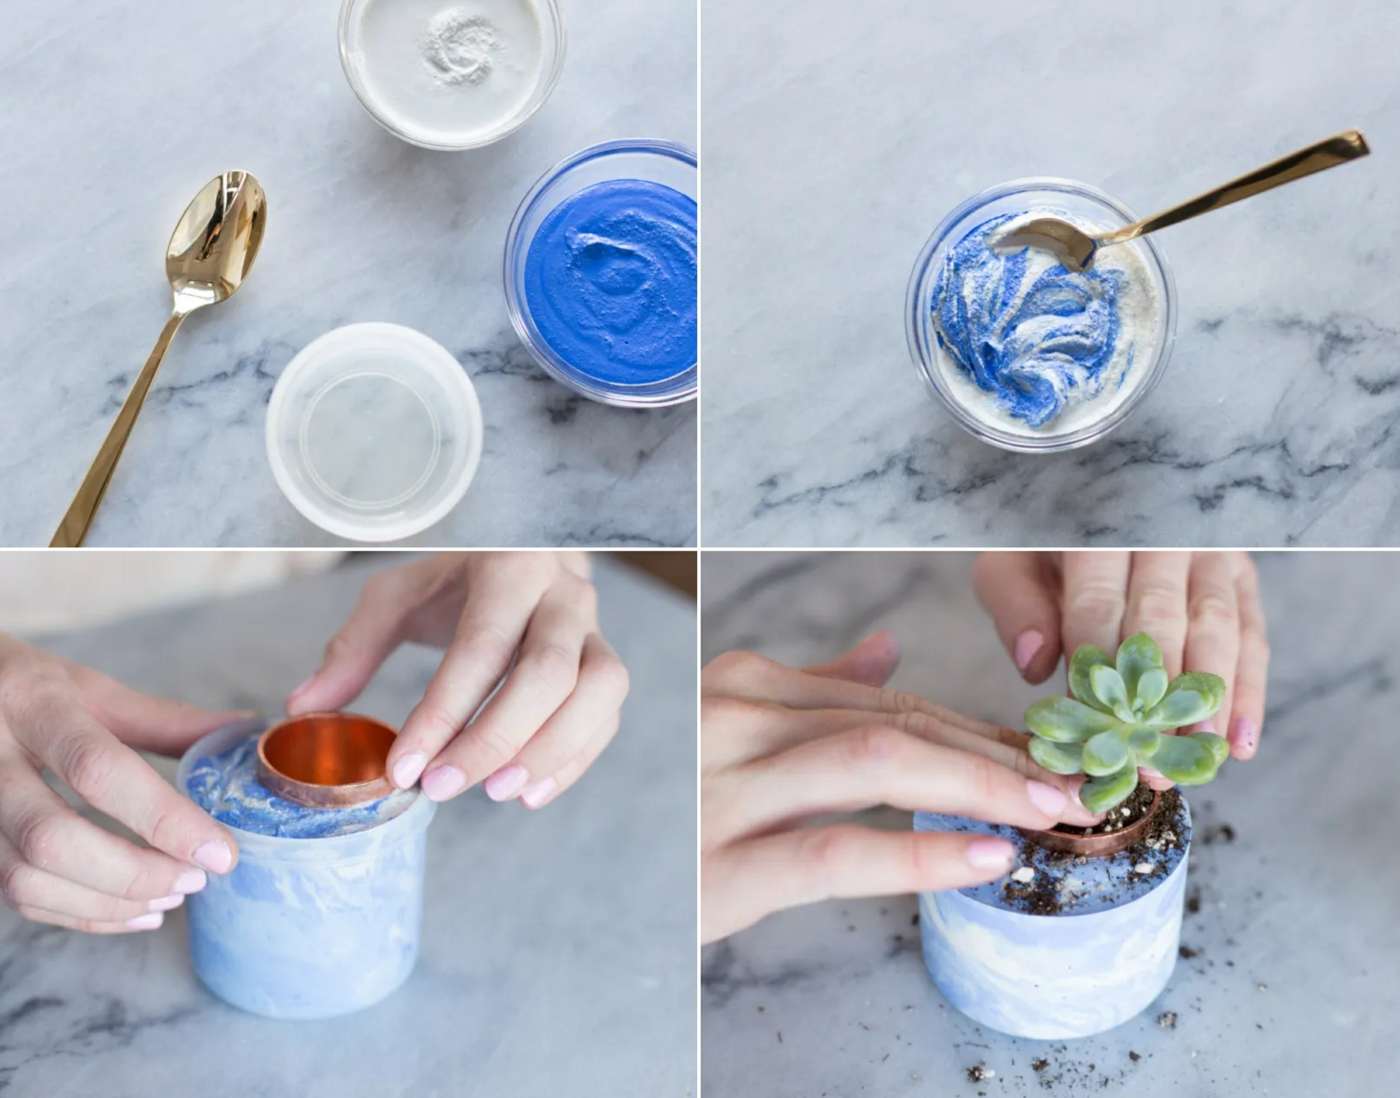
If you use the copper tube: Fill the mold to two-thirds with the concrete mixture and plug the copper tube into it, but only so low that there is still a little over the edge of the container. Then fill the mold around the tube with concrete. If you can't use a tube, simply take a paper roll, which you can remove later. Finally, knock the container down a couple of times at your work area to remove air bubbles. Let the concrete dry and remove the chlorine roll. The copper pipe still remains in Concrete Blumentopf. Plant the succulents in the resulting hole.
Idea for ombre effect
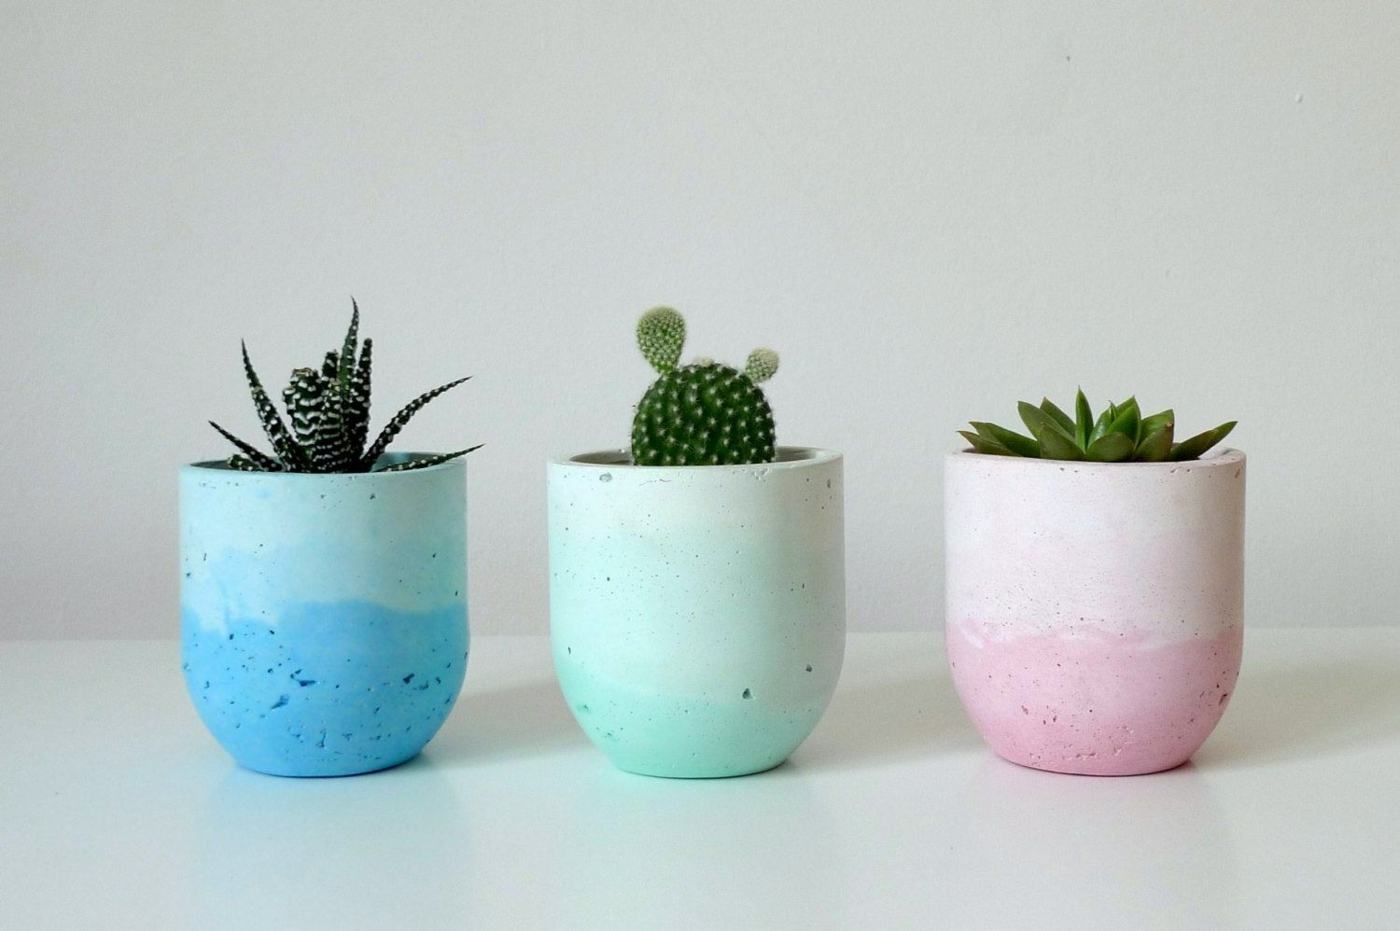
Instead of the marble effect you can choose for an interesting ombre effect. In this case, you will need two to four shades of one color, which you will miss in two to four different containers. Then fill in the first payment method the two or three first shades in the mold, add the tube or roll and fill in the second payment the remaining two or the fourth color. The subsequent steps are the same as for the marble effect.
In this way, you can also make large plant piles of concrete for the garden. Then you probably need a larger amount of concrete and of course a larger container in which you pour the concrete mixture and cure it. Then you can't decorate your entrance area, which adorns the terrace, the balcony or your garden with such an effective concrete flower pot.
The post Concrete flower head for indoor and outdoor self-making - 5 Effective Ideas with Guide appeared first on Deavita.com | Home ideas, design, hairstyles, makeup, lifestyle, health and beauty tips.


